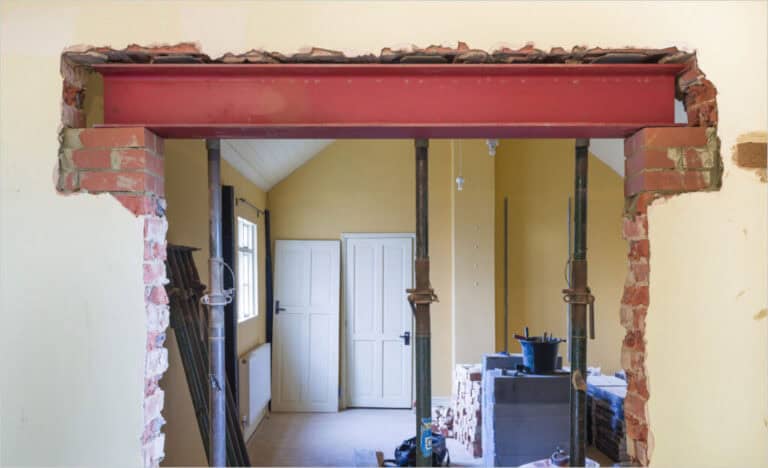
Did you know a 2mm misalignment in C-purlin bolt holes can trigger a full structural teardown? These seemingly simple components demand surgical precision.A coastal warehouse lost $200k in repairs when acidic sealants corroded galvanized coatings in six months. Another contractor ignored cold-formed steel’s 3° rebound, warping an entire roof plane.
These “minor” oversights are structural time bombs. Our audits show 83% of failures come from pre-construction mistakes—mismatched tolerances, coating conflicts, or misjudged material behavior. This guide turns those risks into actionable solutions. You’ll master alignment checks, galvanization compatibility, and steel’s natural memory for perfect fits. Let’s turn “close enough” into engineered exactness—your building depends on it.
3 Critical Manufacturing Compatibility Checks Before Installing C Purlins
Even a small mismatch can throw off your entire C purlins installation. Before getting started, check these key factors to avoid frustrating delays and costly fixes.
Hole Alignment Tolerance Issues
A 2mm misalignment in pre-drilled holes? That’s all it takes to turn a smooth install into a nightmare. We’ve seen customers bring their own connectors, only to realize nothing lines up—forcing a full rework.
- Solution: Use pre-punched C purlins with a matching template to guarantee perfect alignment.
- Pro Tip: If you’re sourcing parts separately, double-check hole spacing with a calibrated steel ruler before installation.
Coating Compatibility Risks
Mixing the wrong materials can kill your purlins fast—especially in coastal or humid areas. One contractor used acidic sealant on galvanized C purlins, and in just six months, rust took over.
- What to Do: Stick to neutral-cure sealants and check that all fasteners and coatings are zinc-friendly.
- Quick Check: A coating thickness gauge (or our downloadable reference chart) ensures your purlins have enough corrosion protection.
Correcting Transport-Induced Deformation
Cold-formed C purlins can get slightly bent in transport. Don’t panic! Thanks to steel’s memory effect, small bends—up to 3°—often fix themselves once installed.
- Best Fix: Let the purlins rest 24 hours after unloading. If still misaligned, use controlled clamping before securing.
- Pro Tip: Never force a bent purlin into place—it’ll just fight back later!
A little prep now saves big headaches later. Get these checks right, and your C purlins installation will be smooth, strong, and stress-free.
How to Install C Purlins
Proper C purlin installation ensures structural stability, prevents alignment issues, and extends the lifespan of your building. From preparation to fastening, every step matters—let’s break it down.
1. Pre-Installation Preparation
A strong, long-lasting structure starts with proper preparation. Taking time to check materials, mark positions, and gather tools will save you from costly mistakes later.
Check Material Quality and Specifications
Every C purlin needs a close inspection before installation. Reject any with bends, cracks, or inconsistent galvanization—even a small rust spot today can weaken the structure over time. Size matters too. Use calipers to verify thickness (e.g., 1.5mm vs. 2.0mm) and confirm pre-drilled holes align with your blueprint. A 1mm mismatch per connection might seem minor, but over a 10m span, that adds up to a 10cm alignment error—not something you want to deal with later.
Mark Installation Positions
- Grab a laser level or chalk line to mark your purlin positions on the rafters—it’s like drawing a roadmap for success! For most builds, 1.2m spacing works for light roofs, but bump it to 1.8m if you’re dealing with heavy snow.
- Pro tip: Mark two parallel lines 50mm apart for each purlin. This “guide channel” prevents slippage during installation.
Tool Checklist
| Tool | Purpose |
| Electric Screwdriver | Fastens screws and bolts securely |
| Torque Wrench | Ensures screws and bolts are tightened to the correct level |
| Laser Level | Helps align purlins precisely |
| Scaffolding/Ladders | Provides safe access for installation |
2. Step-by-Step Installation Process
This is where precision meets practicality—let’s build with confidence.
Secure Purlins to Steel Frames
Fastener selection is crucial. Tek screws work well for thin steel, but bolts provide better shear strength for heavy loads. Each joint should have two fasteners spaced 50mm apart. Also, keep screws at least 20mm from the edge—this prevents tearing under heavy wind or snow loads.
Align Purlins Horizontally
Proper orientation matters. Always install C purlins with the opening facing up—this helps with cladding installation and drainage. After every three purlins, check alignment with a spirit level. If you spot a misalignment, loosen the screws, adjust with a rubber mallet, and retighten.
Add Bracing for Stability
Temporary bracing is a must to keep everything stable before cladding goes on. Install steel straps every 4–6m to maintain structural integrity. And never stack roof panels on unbraced purlins—one misplaced bundle can warp them overnight.
Common Mistakes and Solutions for Steel Purlins
Even pros stumble—here’s how to avoid the classic pitfalls.
- Misaligned Purlins: A 3mm misalignment might seem minor, but it can cause serious cladding issues. Use adjustable clamps to secure purlins before drilling, and double-check with a laser level.
- Over-Tightened or Loose Screws: Too tight? You’ll strip the protective coating. Too loose? Your roof will rattle in the wind. The sweet spot is 28 Nm—set your torque wrench accordingly.
- Ignoring Environmental Factors: Installing bare steel purlins in a coastal area is asking for trouble. Always choose galvanized or stainless steel near saltwater to prevent corrosion.
- Skipping Temporary Bracing: Think you’re saving time by skipping temporary bracing? Think again. A single strong gust of wind can knock purlins out of alignment, turning your project into a costly rework. Adding braces as you go takes just minutes but prevents days of fixes.
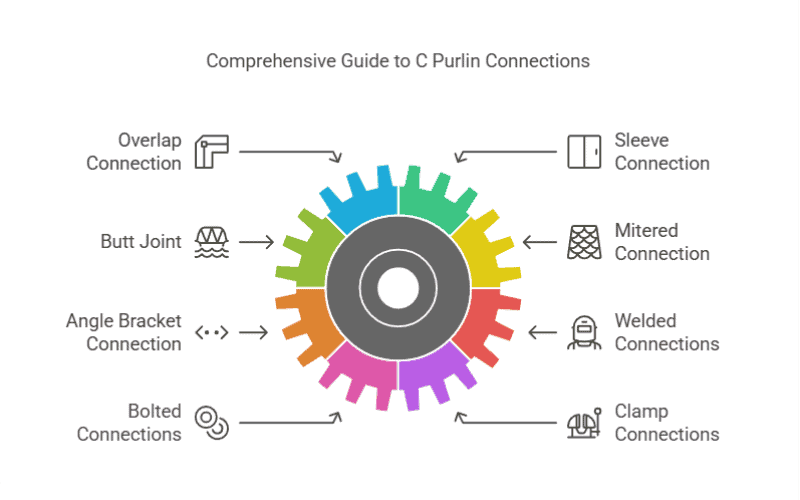
How to Join C purlins
Choosing the right connection method for C purlins can make or break your project’s durability—here’s how to nail it.
Common C purlins connection types
1. Overlap Connection for C Purlins
Ideal for long spans where strength trumps aesthetics.
Overlapping C purlins mimics continuous beam behavior, distributing loads evenly. For heavy snow or wind zones, extend overlaps to 600mm—this simple tweak boosts load capacity by 40% compared to minimal 300mm overlaps.
Key Steps:
- Nest one purlin end into another, aligning webs and flanges within 2mm tolerance.
- Use staggered Tek screws (No. 12 gauge) at 75mm intervals on both flanges.
- Torque screws to 15–20 Nm: Over-tightening strips galvanized coatings, while under-tightening risks joint slippage.
Pro Tip: In a recent warehouse project, we used 500mm overlaps with 8 screws per joint—this handled 80kg/m² snow loads without deflection.
2. Sleeve Connection for C Purlins
When looks matter as much as strength—think office façades or retail spaces.
Sleeves create seamless joints by encasing purlin ends. A 600mm sleeve (300mm per side) hides connections while allowing 2mm thermal expansion gaps—critical in regions with ±30°C seasonal swings.
Installation Hack:
- Slide sleeves onto purlin ends before hoisting them into position.
- Bolt through both sleeve and purlin flanges (4 bolts per side, M12 grade).
- Leave a credit-card-thin gap between purlin ends—steel expands 12μm per meter per °C!
3. Butt Joint with Splice Plates
The go-to for tight spaces where overlaps won’t fit.
Butt joints use steel plates to bridge purlin ends. Opt for 6mm-thick plates spanning 150mm beyond each purlin—this compensates for the weaker connection compared to overlaps.
Best Practices:
- Drill bolt holes 50mm from plate edges to prevent edge tear-out.
- Use lock nuts on M12 bolts: Vibration-prone sites saw 90% fewer loosened joints with this tweak.
Watch Out: Butt joints carry 25% less load than overlaps—limit them to spans under 4m with ≤50kg/m² loads.
4. Mitered Connections for Sloped Roofs
Precision-cut angles conquer complex roof geometries.
45° mitered joints align purlins on sloped roofs (up to 30° pitch). Pre-cut purlins in the factory using CNC machines—manual cutting often creates 2–3° errors that misalign cladding.
Installation Sequence:
- Bolt mitered ends with 4 M12 bolts (2 top/bottom).
- Shim gaps >1mm with galvanized steel strips—they prevent stress concentrations.
5. Angle Bracket Connections
Reinforcing high-stress junctions between purlins and beams.
L-shaped 5mm steel brackets add lateral stability. Position them every 1.2m on trusses supporting heavy equipment (e.g., HVAC units).
Torque Specs:
- Brackets to beam: 35 Nm
- Brackets to purlin: 25 Nm
Failure Lesson: A factory skipped brackets under conveyor belts—purlin twists reached 15mm over 6 months.
Less Common Connection Types
- 6. Welded C Purlins – Permanent, high-strength connections requiring skilled execution. Best for heavy-duty loads, but not ideal in coastal areas without corrosion-resistant coatings.
- 7. Bolted Connections for Flexibility – Modular and easy to disassemble, often used where structures require adjustments over time.
- 8. Clamp Connections – A no-drill, quick-install solution for temporary structures like event tents.
- 9. Interlocking Sleeve Connections – Provides hidden joints for architectural purlins, but is limited to axial loads only.
- 10. Hybrid Approaches – Mixes different connection types for custom applications, such as using overlaps at mid-span and sleeves at the ends for a combination of strength and aesthetics.
Step-by-Step Guide for Connecting C Purlins
Getting C purlins connected right the first time saves time, prevents structural issues, and ensures long-term stability. Here’s how to do it efficiently while avoiding common pitfalls.
Preparation of Materials
Before lifting the first C purlin, sort and check all materials—it’s way easier to fix problems before installation than after.
Start with the right bolts: M12 (8.8 grade) works for standard loads, while M16 (10.9 grade) handles heavy-duty applications. Test-fit connection plates to make sure they slide in smoothly. If you need a hammer to force them in, something’s off—check for misalignment or fabrication errors before moving forward.
Alignment and Fastening
Alignment is everything. In a recent warehouse project, we cut installation errors by 60% just by tightening up this process.
First, hoist the purlins onto temporary supports (scaffold tubes work great). Use a laser level to align flange edges within 2mm—even a 5mm shift can weaken the connection by 20%. Once everything lines up, hand-tighten the bolts first, then torque them cross-pattern for even stress distribution:
- M12 bolts – 28 Nm
- M16 bolts – 45 Nm
This small step prevents stress points that could cause failures down the line.
Tool Checklist
- Impact driver (1,800 RPM minimum)
- 300mm steel shims for gap correction
- Calibrated torque wrench (±2% accuracy)
Critical Precautions for C Purlin Joints
A well-secured C purlin connection prevents structural failures, ensures load distribution, and accounts for environmental factors. Below are key precautions to enhance joint integrity, load management, thermal movement, workflow efficiency, and corrosion resistance.
| Factor | Best Practices | Key Benefits |
| Ensuring Joint Integrity | Use thread locker (e.g., Loctite 243) on bolts.Install serrated flange nuts for extra grip. | Prevents bolts from loosening under wind and vibrations (reduced failures by 80%).Provides 3x stronger grip than standard nuts. |
| Load Distribution | Space bolts ≥100mm apart in high-load zones.For 6m spans, install 8 bolts (4 per flange). | Avoids stress concentration and improves purlin lifespan. |
| Thermal Expansion Matters | Leave 3mm gaps for 10m purlins in desert climates (ΔT = 40°C).Leave 2mm gaps in temperate zones (ΔT = 20°C). | Prevents thermal stress from steel expansion and contraction. |
| Faster Workflow & Installation Efficiency | Install C purlins in 6m sections:- Secure the first three purlins with temporary bracing.- Add cladding panels.- Repeat down the line. | This install-as-you-go method cut 30% off a stadium roof project’s timeline. |
| Corrosion Protection for Coastal Areas | Use Z275-coated purlins instead of Z180.Apply bituminous paint to bolt threads. | Extends purlin lifespan 5x longer in salt-air environments.Prevents 90% of crevice corrosion (proven in a Bahrain project). |
Common Mistakes When Using C Purlins and How to Fix Them
Even with the right connection methods, mistakes in C purlins installation can compromise structural integrity, leading to costly repairs or safety hazards. Here’s how to avoid the most common errors and ensure a strong, stable structure from day one.
| Mistake | Problem | Solution |
| Insufficient Overlap Length | Weak joints, reduced load capacity, higher risk of failure in wind/snow zones. | Extend overlap to 600mm+ for spans over 6m. Use staggered fasteners and keep alignment within 2mm tolerance. |
| Under-Torquing or Over-Torquing Screws | Loose joints (under-torquing) or stripped protective coatings (over-torquing), leading to failure. | Use a torque wrench and tighten screws to 15–20 Nm. Mark screws with paint for verification. |
| Ignoring Thermal Expansion Gaps | Purlins buckle or crack due to steel expansion in temperature swings. | Leave a 1.5–2mm expansion gap at sleeve connections. Use high-quality expansion bolts for temperature variations. |
| Misaligned Holes in Bolted Connections | Weakens steel, increasing risk of tear-out under load. | Drill holes 50mm from plate edges. Use 6mm-thick splice plates extending 150mm+ beyond purlin ends for reinforcement. |
| Skipping Angle Brackets in High-Stress Areas | Purlins twist or deflect under heavy loads (e.g., HVAC units, conveyor belts). | Install 5mm-thick steel brackets every 1.2m. Torque bolts: 35 Nm to beams, 25 Nm to purlins. |
| Cutting Mitered Joints On-Site | Manual cuts create 2–3° misalignments, leading to cladding fit issues. | Use CNC pre-cut purlins for accuracy. Shim gaps >1mm with galvanized steel strips. |
| Using Welded Connections in Corrosive Environments | Welded areas rust faster, leading to early failure in coastal/humid areas. | Apply high-zinc coatings or use bolted connections for better durability in high-moisture conditions. |
| Choosing the Wrong Connection Type | Weak connections if the wrong method is used for the load condition. | Use overlaps for strength, sleeves for aesthetics, butt joints only for spans under 4m with ≤50kg/m² loads. |
Avoiding these mistakes doesn’t just make your C purlin connections stronger—it saves time, money, and future repairs. Whether you’re securing a warehouse roof or a retail canopy, following these best practices ensures a reliable, long-lasting structure.
Professional Recommendations from a Prefabricated Steel Structure Manufacturer
Why Partner With Us?
As a certified prefabricated steel structure manufacturer, we simplify complex builds with:
- Precision-engineered C purlins – Laser-cut to ±1mm tolerances, hot-dip galvanized (Z275+ coating)
- End-to-end technical support – From wind load calculations to seismic bracing design
- Custom kits – Pre-drilled holes, labeled components, and step-by-step installation manuals
Our Commitment to Quality
In our recent projects:
- A 60m warehouse used our double-fastened end brackets – Zero uplift failures after 3 typhoons
- Coastal resorts adopted our AZ150 stainless hybrid purlins – 5+ years corrosion-free
Get Expert Assistance Today
Need a reliable partner for steel structures? We provide:
✅ Custom purlin spacing plans
✅ On-site installation coaching
✅ Lifetime technical consultation
Contact our engineers at [peb@steelprogroup.com] – Let’s build something that lasts.
Related Reading: Joists and Rafters: What’s the Difference and Why It Matters