A metal roof overhang typically extends 1–3 inches for most homes and up to 6 inches for steel or PEB structures. The right overhang length depends on factors such as roof slope, climate, and gutter design. Choosing the correct size helps prevent water damage, control wind uplift, and improve overall roof performance.
This guide explains what a metal roof overhang is, the key factors that affect its length, and recommended dimensions for different roof types. You’ll also learn best practices for gutter alignment, the essential components like drip edges and eave trims, and soffit design for underside protection. Step-by-step installation advice, common mistakes to avoid, and maintenance tips are also included to help extend your roof’s lifespan.
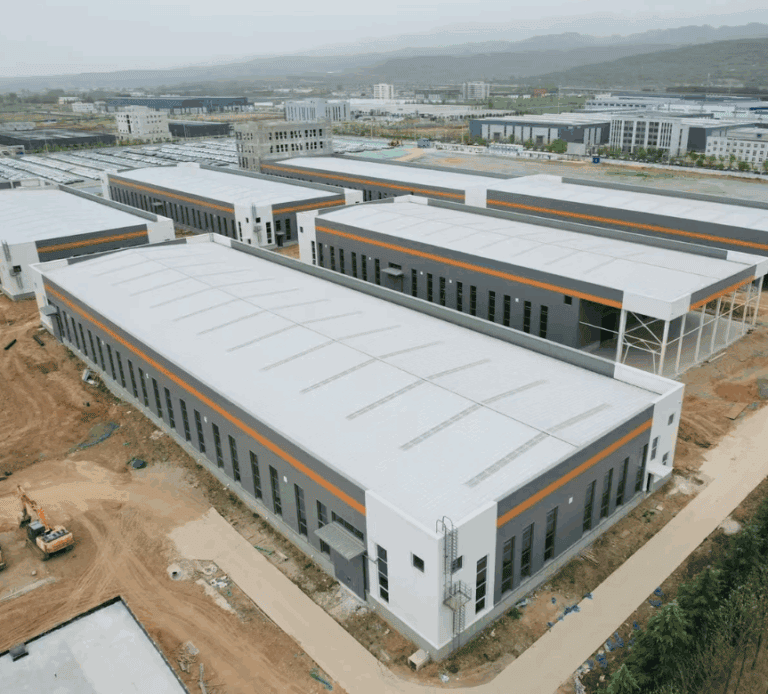
As a certified Steel Structures & PEB Manufacturer, SteelPRO PEB provides factory-engineered overhang systems — including drip edges, eave trims, and integrated gutters — designed for durability, precision, and compliance with international building standards.
What Is a Metal Roof Overhang?
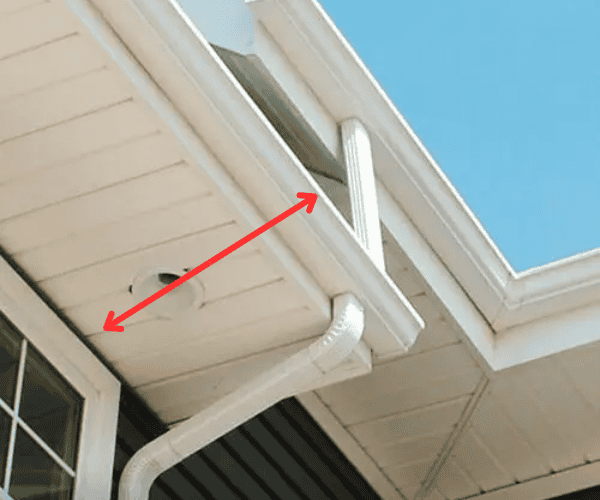
A metal roof overhang is the horizontal extension of a roof panel that goes beyond the exterior wall. It is usually finished with a drip edge or trim to protect the structure from water and wind.
In steel structures and PEB buildings, the roof overhang is not just a decorative detail. It is an engineered component that plays a critical role in waterproofing, ventilation, and durability. Compared with residential houses, factory-made steel buildings require precise edge design because of their larger spans and higher exposure to wind.
Why it matters:
- Directs rainwater into gutters and away from foundations.
- Protects walls and siding from moisture damage.
- Provides shade, lowering energy costs.
- Enhances curb appeal with a balanced roofline.
4 Key Factors Affecting Metal Roof Overhang Length
When deciding how much overhang on a metal roof is best, four main factors will determine the right length. These factors apply to both residential roofs and steel structures (PEB buildings), where precision is even more important for durability and compliance.
Region Climate
- Rainy/Snowy Areas: Overhangs of 4–6 inches are recommended, combined with oversized gutters to prevent ice dams.
- High-Wind Zones: Keep overhangs short (1–2 inches) and use wind clips. Some building codes cap overhangs at 2 inches in hurricane-prone areas.
- Dry/Hot Climates: 2–3 inches works well, paired with light-colored panels to reflect heat.
Roof Design
- Steep Slopes (≥8:12 pitch): Shorter overhangs (1–2 inches) reduce uplift risk.
- Low Slopes (≤3:12 pitch): Longer overhangs (3–4 inches) improve drainage.
- Corrugated Metal Roof Overhang: Typically 2–3 inches, to ensure water properly enters gutters.
- Steel Roof Overhang (PEB structures): Often 3–6 inches, engineered with reinforcement for industrial buildings.
Building Codes & Property Rules
- Most codes require at least 1 inch of overhang.
- In wildfire zones, use non-combustible trims such as galvanized steel.
- Always confirm with your local building authority.
- If your roof edge is near a property line, some regions restrict gutter or overhang extensions (gutter overhanging boundary).
Aesthetic Preferences
- Modern homes: Clean, short overhangs (1–2 inches) with straight trim.
- Traditional styles: Longer (3–4 inches) with decorative profiles.
- Industrial steel buildings: Functional trims with reinforced edges, prioritizing durability over decoration.
Recommended Overhang Length for Metal Roofs
So, how much overhang on a metal roof is recommended? For most homes, the standard range is 1–3 inches, but the exact length depends on roof slope, climate, and whether you use gutters. For steel roof overhangs in PEB structures, longer extensions (up to 6 inches) are common, but they require reinforcement and certified trims.
Minimum Overhang (1–1.5 inches)
- Best for: High-wind regions or minimalist roof designs.
- Why it works: Short extensions reduce the risk of wind uplift.
- Must-have: Always install a drip edge to stop water from creeping behind the fascia.
Standard Overhang (2–3 inches)
- Best for: Most residential homes in mild climates.
- Why it works: Provides balance between weather protection, cost, and stability.
- Common choice for corrugated metal roof overhang, ensuring water flows into gutters.
Extended Overhang (4–6 inches)
- Best for: Rainy/snowy climates, farmhouses, or industrial steel buildings needing extra shade.
- Why it works: Channels water further away and shades walls for energy savings.
- Requirements: Reinforced fascia trim (22-gauge steel) or brackets to prevent sagging.
Corrugated Metal Roof Overhang
For corrugated metal roofs, the recommended overhang is typically 2–3 inches beyond the fascia. Unlike flat or standing seam panels, corrugated profiles form small water channels that guide runoff. A shorter overhang may cause water to drip behind gutters, while excessive extension increases wind lift.In PEB steel structures, corrugated panels are often paired with factory-fitted eave trims and box gutters from SteelPRO PEB, which align precisely with the corrugation profile to ensure clean drainage and faster installation.
Metal Roof Overhang for Different Structures
| Structure Type | Recommended Overhang | Notes |
| Residential roofs | 1–3 inches | Works for most homes with gutters |
| Corrugated metal roofs | 2–3 inches | Prevents overshoot, balances drainage |
| Steel roof / PEB buildings | 3–6 inches | Requires reinforcement + certified trim |
Metal Roof Overhang for Gutters: Best Practices
A metal roof overhang for gutters is usually 1–2 inches, but the exact size depends on the roof slope and gutter type. The goal is simple: water should flow directly into the gutter without overshooting or dripping behind.
Ideal Overhang Length for Gutters
| Roof Slope | Recommended Overhang | Why It Works |
| Low slope (≤3:12) | 2–3 inches | Guides slow-moving water into gutters |
| Moderate slope (4:12–6:12) | 1.5–2 inches | Balances water flow and prevents overshoot |
| Steep slope (≥7:12) | 1–1.5 inches | Stops water from flying past gutters |
Keep at least 1 inch gap between the roof edge and the gutter front lip to prevent water from wicking back onto the fascia.
Roof Overhang Into Gutter: Correct Alignment Distance
To ensure smooth water flow, the roof overhang into the gutter should be measured horizontally, not vertically. Improper alignment can cause overshooting or backflow.
| Roof Pitch | Horizontal Overhang | Distance to Gutter Lip | Notes |
| ≤3:12 (low slope) | 2–3 inches | 1 inch gap | Guides slow-moving water |
| 4:12–6:12 (moderate) | 1.5–2 inches | ¾ inch gap | Balanced flow |
| ≥7:12 (steep slope) | 1–1.5 inches | ½ inch gap | Prevents overshoot |
In SteelPRO PEB gutter systems, drip edges and gutters are pre-aligned at the factory to maintain these exact tolerances — ensuring water always enters the trough, not behind it.
How to Prevent Water Overshooting
- Install a drip edge with kickout → directs rain into the gutter.
- Mount gutters correctly → tilt slightly (1/16 inch per foot) toward downspouts.
- Use oversized gutters → 6-inch systems for heavy rain areas.
- Add gutter guards → keeps debris out, prevents overflow.
Drip Edge Overhang and Alignment for Metal Roofs
A drip edge overhang is a small but critical detail that ensures rainwater flows directly into the gutter rather than behind the fascia. For both residential and industrial roofs, the factory-recommended setup is:
| Roof Edge Type | Drip Edge Extension Beyond Fascia | Recommended Tilt | Material Standard |
| Eave Edge | ½ inch | 5°–10° outward | Galvanized or pre-painted steel |
| Gable Edge | ¾ inch | 5° outward | Aluminum or 22-gauge steel |
| Box Gutter Integration | Flush to fascia | 0° (level) | Factory-engineered steel trim |
Proper drip edge alignment prevents water from creeping under roof panels and reduces corrosion risk at the fascia. SteelPRO PEB supplies factory-cut drip edges with pre-angled profiles to guarantee precision and long-term waterproofing.
Best Gutters for Metal Roofs (Factory-Supplied Options)
- K-Style Gutters (5″ or 6″) – Most common for residential roofs.
- Half-Round Gutters – Traditional look, often used in farmhouses.
- Box Gutters – Integrated into the roof edge, popular in industrial steel buildings.
Yes, you can put gutters on a metal roof, but they must be aligned with the overhang and supported with the right brackets to withstand heavy loads.
Factory-Recommended Gutters for Different Metal Roof Overhangs
Choosing the right gutter system depends on your metal roof’s overhang length, slope, and building type. Below are factory-engineered recommendations from SteelPRO PEB, based on drainage efficiency and structural compatibility.
| Roof Type / Overhang | Recommended Gutter Type | Factory Integration Notes |
| Residential (1–3 inch overhang) | K-Style Gutters (5″–6″) | Best for moderate slopes; integrates easily with factory-supplied drip edges and fascia trims. |
| Low-Slope Roofs (2–3 inch overhang) | Half-Round Gutters (6″) | Smooth water flow; suitable for homes or farm buildings with gentle pitch. |
| Industrial / PEB Roofs (3–6 inch overhang) | Box Gutters (custom size) | Designed for larger runoff volumes; built into eave trims at factory for seamless drainage. |
| Corrugated Roofs (2–3 inch overhang) | Deep Box or Half-Round Gutters | Prevents overshooting due to water channeling; factory-cut drip edge ensures proper alignment. |
SteelPRO PEB integrates gutter brackets, drip edges, and trims during production to reduce installation errors and ensure every overhang performs as engineered. This factory integration minimizes leak risk and guarantees compliance with ISO and ASTM E1592 performance standards.
Common Mistakes to Avoid
- Overhang too short (<1 inch) → Water drips behind gutters, causing fascia rot.
- Overhang too long (>3 inches) → Water overshoots the gutters.
- No drip edge → Water creeps back under panels.
- Gutters too far from roof edge → Rain misses the gutter completely.
Why Metal Roof Overhang Length Matters
Choosing the right metal roof overhang length is not just about looks. It directly affects weather protection, energy efficiency, and the service life of your building.
Weatherproofing
A correct overhang shields walls from rain, prevents leaks, and reduces the risk of rot. For steel roof overhangs in PEB structures, proper length also reduces corrosion at the wall-roof joint.
Ventilation Boost
Overhangs work with soffit vents to improve airflow, keeping attics and roof spaces dry and mold-free.
Energy Savings
By shading walls and windows, a metal roof overhang can lower AC use by 10–15% in summer and block cold drafts in winter.
Style Points
A 2–3 inch overhang balances the roofline and improves curb appeal. In industrial buildings, reinforced trims provide a clean, professional finish.
Longer Lifespan
Proper overhang length protects siding, fascia, and foundations, extending material life by 10+ years.
Essential Components of a Metal Roof Overhang
A metal roof overhang is not complete without the right edge details. Components like drip edges, screws, trims, and flashing make the difference between a roof that lasts decades and one that fails within years.
Drip Edge: The First Line of Defense
A drip edge is a thin piece of metal flashing installed at the edge of the roof.
- Purpose: Redirects rainwater into the gutter and away from fascia.
- Best practice: Extend at least ½ inch beyond fascia and tilt outward by 5–10°.
- Materials: For steel roof overhangs, galvanized steel or pre-painted steel is recommended.
- Note: Copper drip edges are sometimes used in residential projects, but in PEB steel structures, certified steel trims are the standard for durability and compliance.
Metal Roof Eave Overhang Standards
The metal roof eave overhang is the horizontal extension at the bottom edge of the roof, designed to protect walls and support gutters.
According to factory standards:
- Residential roofs: 1–2 inches beyond fascia for light rainfall zones.
- Industrial / PEB roofs: 3–6 inches with reinforced fascia trim (22-gauge or thicker).
- With gutters: Maintain a 1-inch gap between the eave edge and gutter front lip.
All SteelPRO PEB roof systems are engineered with pre-measured eave trims that maintain structural alignment and ensure drainage efficiency under high wind or heavy rain conditions.
Supporting Longer Overhangs
Extended overhangs (4 inches or more) require reinforcement to prevent sagging and uplift.
- Brackets or stanchions: Installed every 16–24 inches to support panels.
- Reinforced fascia trim: 22-gauge steel helps maintain shape.
- End caps for metal roofing: Seal the roof edge, protect against water ingress, and improve appearance.
- Best screws for metal roof: Factory-supplied self-tapping screws with sealing washers prevent leaks and rust.
Choosing the Right Roof Edge Trim
Different trims protect the overhang and shape the roofline.
- L-Shape Trim → Simple and cost-effective.
- J-Channel Trim → Best for soffit integration.
- Box Gutter Trim → Often used in industrial steel buildings with integrated gutter systems.
- Bullnose Trim → Decorative curved edges for traditional homes.
- Eave flashing for metal roof → Essential for sealing the joint between roof panels and fascia, protecting against water intrusion.
Metal Roof Soffit and Underside Overhang Design
A metal under roof overhang, also called the soffit area, protects the underside of your roof while improving ventilation and aesthetics. For steel roof overhangs in PEB structures, soffit design is more than visual—it is part of the building’s engineering for durability and compliance.
Open vs. Enclosed Overhangs: Which One Is Best?
- Open Overhang (Exposed Rafters):
- Common in rustic or farmhouse designs.
- Provides natural ventilation.
- Requires frequent maintenance to protect exposed wood or steel.
- Enclosed Overhang (Soffit Panels):
- Standard for modern homes and steel buildings.
- Shields the underside from moisture, pests, and fire hazards.
- In PEB structures, enclosed metal soffits are the factory-recommended option for safety and durability.
For large-scale steel structures, enclosed soffits with perforated metal panels are the most reliable choice, balancing ventilation with long-term protection.
Best Materials for Metal Roof Soffits
| Material | Pros | Cons |
| Metal Soffit (Steel/Aluminum) | Fire-resistant, durable, low maintenance, matches roof panels | Slightly higher cost |
| Vinyl Soffit | Budget-friendly, resists moisture | Can warp under high heat |
| Wood Soffit | Natural look, customizable | High maintenance, vulnerable to rot |
| Fiber Cement Soffit | Rot-proof, fire-resistant | Heavier, higher cost |
For PEB steel buildings, factory-certified steel soffit panels are the best choice, ensuring compliance with fire codes and reducing maintenance.
Why Proper Soffit Design Matters
In industrial steel structures, soffit design extends roof lifespan and ensures building code compliance.
Prevents wind-driven rain from reaching rafters.
Improves airflow to reduce condensation and attic mold.
Blocks pests and birds from nesting.
Enhances appearance with a clean, finished edge.
Why Proper Soffit Design Matters
- Prevents Water Damage – Stops wind-driven rain from reaching rafters.
- Enhances Roof Ventilation – Helps prevent moisture buildup and attic mold.
- Keeps Pests Out – Closes gaps where birds, bats, or insects might nest.
- Improves Aesthetics – Gives your home a clean, finished look.
By paying attention to what’s under your roof overhang, you’ll not only extend the lifespan of your metal roof but also improve your home’s energy efficiency and durability.
Step-by-Step Metal Roof Overhang Installation Guide
Installing a metal roof overhang is straightforward when you use the right materials and follow best practices. For steel roof overhangs in PEB structures, factory-certified components ensure faster installation and longer service life.
Tools and Materials You’ll Need
- Metal roof panels (factory pre-cut when possible)
- Drip edge and eave flashing
- Factory-supplied screws with sealing washers (best screws for metal roof)
- End caps for metal roofing
- Polyurethane sealant
- Laser level and measuring tape
- Safety gear: harness, gloves, non-slip shoes
Step-by-Step Process
- Measure Twice: Mark the overhang length on both ends. Keep error ≤ 1/8 inch.
- Install Drip Edge: Place the drip edge and eave flashing at the roof edge. Tilt outward at 5° for proper water flow.
- Secure Panels: Align roof panels with the marked overhang. Fasten using factory-certified screws with washers.
- Seal All Gaps: Apply polyurethane sealant at seams and joints to prevent leaks.
- Cut Panels (if required): Use factory pre-cut panels whenever possible. If trimming on-site, the best way to cut metal roofing is with metal shears—not abrasive blades, which can damage coatings.
- Install End Caps: Add metal end caps to protect panel edges, stop water intrusion, and improve appearance.
- Test Drainage: Simulate rain with a hose to check that water flows into gutters without overshooting.
In PEB structures, overhang installation is simplified by using factory-standard kits (panels, trims, screws, and end caps), ensuring compliance and durability.
Common Mistakes to Avoid with Metal Roof Overhangs
Even a well-designed metal roof overhang can fail if installed incorrectly. Avoid these common mistakes to protect your roof, siding, and gutters:
- Overhang too short (<1 inch) → Water drips behind gutters, causing fascia rot.
- Overhang too long (>3 inches) → Rain overshoots gutters, leading to erosion.
- No drip edge installed → Water creeps under panels and damages the roof deck.
- Gutters placed too far from edge → Rain misses gutters completely.
- Loose or thin trim → Panels rattle, weaken, and shorten roof lifespan.
- Using non-certified screws or trims → In steel roof and PEB structures, this reduces durability and may void factory warranties.
Maintenance Tips for a Long-Lasting Metal Roof Overhang
A metal roof overhang can last decades if you follow simple maintenance steps. Regular care prevents leaks, rust, and unnecessary repairs.
Annual Inspection
Check for loose screws, damaged trim, or cracked sealant. Pay special attention to the drip edge and gutters, since they take the most water impact.
Gentle Cleaning
Use a soft brush or cloth to remove dirt and debris. Avoid harsh chemicals or power washing, which can damage protective coatings.
Rust Prevention
If you see rust spots, sand lightly and repaint with rust-resistant coating.
Gutter Maintenance
Clear gutters twice a year. Blocked gutters cause water to back up and damage the overhang and fascia.
Use Factory-Certified Materials
Metal soffits, trims, and screws supplied by the manufacturer require less maintenance compared to non-certified parts.
What is the maximum safe overhang for a metal roof?
The maximum safe overhang for most metal roofs is about 6 inches. Anything longer can catch wind and stress the roof edge, especially in high-wind or snowy regions. Industrial PEB roofs may extend up to 6 inches only when reinforced with 22-gauge fascia trims or brackets.
Can a metal roof have no overhang?
A metal roof can be built without an overhang, but it’s generally not recommended. A flush edge lets rain run directly down the wall, increasing the risk of leaks and siding damage. Even a 1-inch overhang offers essential water protection.
Should the drip edge extend into the gutter or stop before it?
The drip edge should extend about ½ inch into the gutter. This overlap ensures rainwater flows directly into the gutter trough and doesn’t run behind the fascia or roof panels. SteelPRO PEB factory-supplied drip edges are pre-angled at 5–10° outward for optimal drainage.
Do you need special gutters for a metal roof?
Yes. Metal roofs require compatible gutters designed for expansion and stronger water flow. K-style and box gutters work best, while factory-supplied SteelPRO PEB gutter systems include custom brackets and drip edge alignment to prevent leaks.
How far should the metal roof hang over the gutter?
A metal roof should hang 1 to 2 inches horizontally over the gutter. This distance allows smooth water flow without overshooting during heavy rain. On low-slope roofs, up to 3 inches may be needed to guide slow-moving water.
Can water run behind the gutter on a metal roof?
Yes, water can run behind the gutter if the drip edge or gutter lip isn’t aligned correctly. Proper installation requires a ½-inch overlap between the drip edge and gutter front lip. SteelPRO PEB systems integrate both components at the factory to eliminate this issue.
Is corrugated metal roofing different from standing seam in overhang length?
Yes. Corrugated metal roofing typically needs a 2–3-inch overhang, while standing seam panels perform best with 1–1.5 inches. Corrugated panels channel water in ridges, requiring a longer extension to ensure proper drainage into gutters.
Do metal roof overhangs need soffits or fascia boards?
Yes. Metal roof overhangs should include soffits and fascia trims to protect the underside from moisture and pests. Factory-made metal soffits also enhance ventilation and extend roof lifespan, especially in enclosed or industrial designs.
Are there building code requirements for metal roof overhangs?
Most building codes require at least a 1-inch overhang and the use of non-combustible edge materials. In wildfire or hurricane zones, local rules may also limit maximum overhang length. Always confirm specifications with your certified manufacturer or local authority.
Can wind lift a metal roof if the overhang is too long?
Yes. Long overhangs increase wind uplift pressure, especially beyond 3 inches. This can cause roof panels to bend or detach during storms. SteelPRO PEB recommends shorter, reinforced overhangs in high-wind zones for better structural performance.
Factory Support and Expert Assistance for Metal Roof Overhangs
Designing and installing a metal roof overhang requires more than guesswork. The right choice of length, trims, soffits, and gutter systems ensures your roof lasts for decades.
At SteelPro PEB, we are not just an information source—we are a Steel Structures / PEB Structures Manufacturer with:
- 24 production lines and 120,000 tons annual capacity
- Over 1,000 international projects completed since 2013
- ISO & CE certified products, compliant with IBC, Eurocode, ANSI/AISC standards
- 50-year structural warranty and up to 25 years corrosion warranty
What we provide for your metal roof overhang:
- Factory-certified drip edges, end caps, screws, soffits, and gutters
- Custom engineering for residential, commercial, and PEB steel structures
- Direct manufacturer pricing with full certification and warranty
Contact us today for a factory-direct quote on metal roof overhang systems—engineered to protect your building and backed by global certifications.