Starting a food business? Traditional kitchens are expensive, slow to build, and take up too much space. For chefs, entrepreneurs, and mobile food startups, a shipping container kitchen offers a smarter way—cost-effective, compact, and built to move when you need it to.
From mobile coffee shops to permanent ghost kitchens, shipping container kitchens are gaining ground for being both practical and future-ready. They’re not just steel boxes—they’re efficient, scalable workspaces designed for real food service operations. In this guide, we’ll cover the key design choices that truly matter—from layout and ventilation to plumbing, mobility, and compliance—all based on real experience as a prefab container kitchen manufacturer.
Customization and Compliance in Shipping Container Commercial Kitchens
Designing a container kitchen isn’t just about creativity—it also needs to meet strict health, safety, and fire regulations. The right custom features should enhance your kitchen’s function while keeping you fully compliant from the start.
Plan for Health and Fire Code Compliance From Day One
Every city or region has its own set of codes—and they’re not optional. Whether it’s clearance around cooking equipment, proper exhaust routing, or hand sink placement, these details must be baked into the design.
Sometimes clients only learn about code issues during final inspection. At that point, you’re cutting into finished walls or re-routing systems—not ideal. Understanding your local requirements early helps avoid expensive surprises later.
Modular Customization Keeps Your Kitchen Functional and Flexible
Customization isn’t just for looks—it’s how your kitchen runs efficiently in a small space. Here are some features we often see used in smart designs:
- Fold-out service windows for smoother order flow
- Custom doors placed for easier staff access
- Rooftop access for HVAC or exhaust systems
- Built-in shelving and prep counters to maximize wall space
These modular touches aren’t hard to add in the factory stage—but they’re tough to adjust after install. We always suggest finalizing all cutouts, access points, and utility spaces before fabrication.
Use Only Commercial-Grade, Certified Kitchen Equipment
One big mistake first-time buyers make? Choosing consumer-grade appliances. But in most regions, you’ll need UL-listed or NSF-certified equipment to pass inspections and meet food safety laws.
It’s not just about approval—these items are safer, more durable, and built to withstand daily commercial use.
We’ve seen several projects where clients had to reconfigure entire layouts after failing local inspections. It’s frustrating and expensive—and often avoidable. If your kitchen is designed with compliance in mind, inspectors can walk in and check off requirements without issue. That’s when customization and code work together: to build a kitchen that performs and passes the first time.
Layout Planning in Shipping Container Kitchen Design
With limited space in a 20ft or 40ft unit, your layout can either boost efficiency or cause daily headaches. Let’s walk through the essentials that keep a container kitchen practical, functional, and easy to work in.
Optimize Small Kitchen Layouts in 20ft or 40ft Container Spaces
Shipping containers don’t offer a lot of room, so the layout needs to be tight but functional. In a 20ft container, you’re usually working with under 150 square feet—which means no wasted steps, no bulky equipment you don’t absolutely need. Even in a 40ft unit, space feels limited once you factor in sinks, cooktops, refrigeration, and storage.
From our experience, Single-line layouts work well in narrow builds, while L-shaped or galley styles suit longer setups. Clearance is key: staff need room to move, open doors, and stay safe during peak hours. Don’t just fit everything in—plan for how it’s actually used.
Divide Functional Zones for a More Efficient Kitchen Workflow
A container kitchen may be small, but it still needs to function like a professional kitchen. That means dividing it into clear zones:
- Cooking zone: ovens, fryers, grills, and exhaust systems
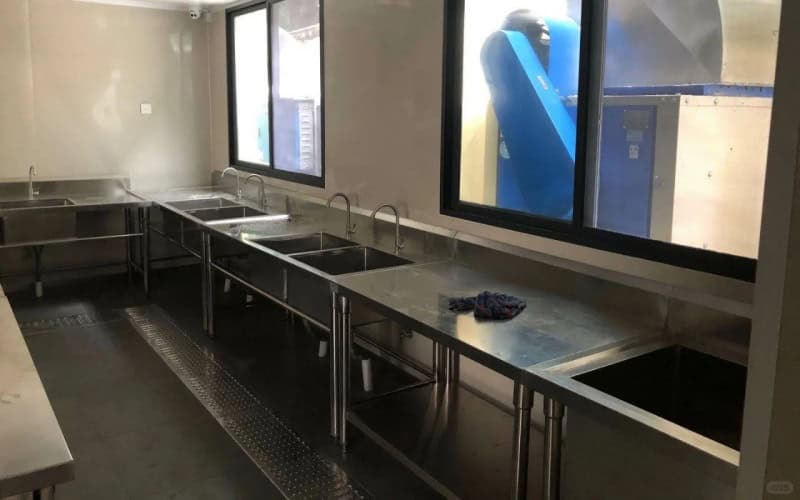
- Prep zone: counters, sinks, cutting surfaces
- Storage zone: dry storage, cold storage, utensil shelving
- Cleaning zone: hand sinks, mop sink, dishwashing
- Service window or pass-through: where orders go out
In real projects, we’ve seen how skipping proper zoning leads to chaos. For example, placing the fridge next to the grill might seem like a space saver—until staff start crossing paths constantly. It’s not just about where things fit, it’s about how they function together.
Plan Kitchen Workflow to Minimize Cross-Traffic
Even in a small space, movement matters. Efficient flow means ingredients, tools, and staff all move in one direction—from receiving to cooking to service to cleaning.
We often recommend clients sketch out the cooking process step by step. Who does what, where, and in what order? Then design the layout to follow that flow. This one step can save a lot of frustration during busy hours, especially when you’re short-staffed or working with tight schedules.
Always Finalize a Layout Drawing Before Fabrication Starts
This part sounds obvious, but it’s one of the most common missteps: rushing into production without a finalized layout. We’ve seen clients change equipment specs or switch appliances halfway through—and it leads to delays, rewiring, and extra costs. A detailed layout drawing should be locked in before any steel gets cut. Once your kitchen is fabricated, it’s much harder—and more expensive—to make changes.
Curious about how 20ft kitchens are typically laid out? You might find our guide to 20ft container kitchen layout helpful for real-world examples.
Ventilation and Insulation for Shipping Container Kitchens
In a steel container, heat, smoke, and moisture build up fast—so ventilation and insulation aren’t add-ons, they’re essential for comfort, safety, and kitchen performance.
Heat and Airflow Challenges in Container Kitchen Builds
Shipping containers are sealed metal structures that trap heat quickly once cooking starts. Add steam from dishwashing and grease from fryers, and things get uncomfortable fast. Overheating of equipment and spoilage of food can make it difficult for employees to concentrate in poorly ventilated kitchens.
Standard fans won’t cut it. You need commercial-grade exhaust systems with proper grease filters and ventilation hoods designed for real kitchen use. These systems move heat and fumes out efficiently and reduce fire risk.
Ventilation must also match your layout. Placing fryers or grills under undersized hoods leads to daily smoke and compliance headaches. Getting airflow right from the start avoids expensive retrofits later.
Why Proper Insulation Matters in All Climates
Ventilation handles what’s inside—insulation keeps outside heat and cold from affecting your space. Without insulation, your kitchen becomes unbearable in hot weather and unstable in cold conditions. Fluctuating temperatures can shorten the life of your equipment and make daily work difficult.
From experience, closed-cell spray foam offers the best seal against both heat transfer and moisture buildup. It’s compact, effective, and pairs well with stainless steel wall finishes, which are durable, fire-safe, and easy to clean.
Not sure which insulation method is best for your kitchen? Our guide on insulating a shipping container covers materials, techniques, and climate-specific tips.
Best Material Choices for a Durable Kitchen Interior
When it comes to building a container kitchen that holds up long term, materials matter just as much as layout. We recommend:
- Insulation: Closed-cell spray foam or rigid foam board for thermal stability
- Interior walls: Stainless steel or aluminum composite panels—fire-resistant and easy to sanitize
- Ceiling finish: Moisture-resistant surfaces to prevent mold and grease buildup
These finishes perform well in compact, high-heat environments. Choosing the right materials upfront makes cleaning easier and keeps your kitchen running smoothly.
Plumbing and Electrical Integration in Container Kitchen Design
A container kitchen isn’t plug-and-play—getting the plumbing and electrical systems right is what turns it from a steel box into a fully working kitchen. Let’s break down what we’ve learned from real builds to help you avoid common missteps.
Plan Plumbing Lines Based on Real Site Conditions
Utility access often gets missed in early planning. Fresh water, wastewater, and grease traps all need to connect properly based on the site’s layout and limitations.
We’ve seen drainage issues or missing gray water access delay installations. That’s why plumbing should be designed around what the site can actually support, not just the kitchen layout.
The grease trap also needs space—either beneath or beside the unit. As a container home manufacturer, our container factory pre-routes plumbing during the manufacturing stage to avoid cutting into the flooring later—keeping your container kitchen clean, efficient, and visually seamless.
Match Power Load to Equipment Needs
Most container kitchens use commercial appliances—grills, fryers, fridges—that demand serious power. You’ll often need a 3-phase system with a properly sized breaker panel.
Planning ahead matters. Make sure circuits are balanced, and don’t overload outlets near heat-generating equipment. It’s safer and avoids constant resets.
Clients sometimes forget to include things like vent hoods or water heaters in power estimates. That’s where clear, detailed planning saves trouble down the line.
Factory-Installed MEP Systems Save Time and Stress
We’ve found that installing MEP—mechanical, electrical, and plumbing—during factory build makes the process faster and cleaner. It reduces on-site surprises and speeds up final hookups.
On-site installation often runs into space issues or inspection delays. Factory installs offer better quality control and fewer headaches once the unit arrives.
Mobility and Anchoring Solutions for Mobile Container Kitchens
A stationary container kitchen can rest on a concrete pad or steel base with minimal anchoring. But once mobility enters the picture, the structure needs extra reinforcement and secure mounting. Mobile kitchens require stronger framing, weather-sealed utility access, and equipment that won’t shift in transit.
We’ve worked with clients who didn’t factor in mobility early and later needed full retrofits—which always cost more than designing for movement upfront.
Use the Right Support and Anchoring for Transport-Ready Builds
For kitchens that move, your base needs to do more than sit level—it must stay stable on the road. These are the most common systems we’ve worked with:
- Trailer mounting: for kitchens that move frequently
- Leveling jacks: to keep things stable on uneven ground
- Anchor bolts: for temporary but secure placement
Choosing the right setup depends on how often the unit will move, what kind of surfaces it’ll rest on, and what local codes require. A proper anchor system also protects against wind uplift and shifting during use.
Keep Road Regulations and Transport Safety in Mind
Before your mobile kitchen hits the road, it needs to meet transport limits. Height and weight restrictions can vary by location, and ventilation units or roof features often need to be secured or made removable.
Any open ducts, panels, or fixtures must be locked down for transport—otherwise, they’re at risk of damage or causing delays. This is where early planning makes all the difference.
Branding and Visual Design Tips for Shipping Container Kitchen Exteriors
A container kitchen can serve amazing food—but if the exterior doesn’t catch attention, you’re missing customers before they even reach the window. The outside needs to work as hard as the inside.
Design an Exterior That Draws People In
Your exterior should feel intentional—not just a painted box. We’ve seen strong results with:
- Color schemes: Use high-contrast combinations like matte black with white or red accents, pastel tones with dark trim, or bright yellow with charcoal gray. Choose colors that align with your food style or brand vibe, and avoid overly busy patterns that distract from your signage.
- Signage and logos: Oversized logos in simple shapes—round or square with clean lines—are easier to recognize from a distance. Raised lettering or backlit acrylic signs add a polished, permanent feel, especially when mounted flush to the steel surface.
- Lighting: LED strip lighting along the roofline or base creates subtle glow and visibility at night. Warm ambient lights around service windows make the space feel more welcoming, while spotlights can highlight menu boards or signage.
It’s not just about being flashy—it’s about being memorable, especially for street-facing or event-based kitchens.
Service-Side Details Make a Big Difference
Where people order matters. A few design tips based on real use:
- Window height should match standing customers—not too high or too low
- Shade awnings keep both staff and guests comfortable in sun or rain
- Menu boards should be visible, weather-resistant, and easy to update
We’ve seen setups where poorly placed windows made service awkward. Little changes here can make service smoother and faster.
Choose Finishes That Withstand Weather and Time
Outdoor conditions will wear down anything that isn’t built to last. Use:
- Anti-corrosion coatings on all steel surfaces
- Weather-sealed lighting and signage components
- UV-resistant paint or wraps to prevent fading
Durable finishes don’t just keep your kitchen looking good—they reduce maintenance costs over time.
Integrate Branding Early in the Build Process
Adding graphics or signage after fabrication often leads to tricky installations or uneven results. We always suggest planning branding elements into the structure itself—like pre-cut signage frames, built-in lighting slots, or logo panels.
It saves time and gives a more polished, professional look. When branding is part of the build, it works better—and lasts longer.
Common Mistakes to Avoid in Shipping Container Kitchen Projects
Here are some of the most common mistakes we’ve seen—and what you can do to avoid them:
- Overloading the kitchen with too much equipment
Stick to what you actually need for your menu. Too many appliances leave no space for staff movement or safe operation. - Ignoring local regulations until too late
Always check health and fire codes before you finalize the design. It’s easier to plan for them than fix issues after inspection. - Cutting corners on ventilation or finishes
Cheap fans and non-commercial finishes may save money now but usually lead to compliance problems and costly retrofits later. - Designing without thinking about customer flow
Plan around how customers order and pick up. Poor window placement or crowded service zones slow everything down. - Choosing residential-grade appliances
Always go for UL-listed or NSF-certified equipment—most regions require them, and they’re built to last. - Not planning for future upgrades or repairs
Leave access panels and modular sections where possible. It’ll save you hassle down the line. - Forgetting to check site utilities early
Make sure your location supports the kitchen’s plumbing and power needs before fabrication begins.
Getting these things right early keeps your build smoother, safer, and far more efficient in the long run.
Work with a Trusted Container Kitchen Manufacturer for Smarter Builds
Partnering with an experienced container kitchen manufacturer from the start can make a big difference in cost, quality, and speed. We don’t just provide a basic shell—we support full customization, including layout planning, structural adjustments, and MEP (mechanical, electrical, plumbing) integration. We also handle indoor and outdoor finishes like wiring, plumbing, doors, windows, and stainless steel flooring, and we help you choose the right color scheme to match your brand.
Our builds are precision-leveled—your kitchen floor will be completely flat, ensuring proper drainage, safe prep zones, and stable equipment. All systems can be pre-installed at our factory to save you time on-site and avoid inspection delays. Whether you’re creating a compact container kitchen or a full-scale shipping container restaurant, early collaboration helps us design around your exact needs—from workflow to branding to long-term durability.
If you’re ready to launch a smart, efficient, and great-looking container kitchen, we’re here to help you build it right from the ground up.