Shipping containers are built tough for transport—not for living. They come with zero insulation, which means they get blazing hot or freezing cold fast. If you’re planning to turn one into a home or office, adding insulation is non-negotiable.
A lot of DIY builders skip it at first—then wonder why it feels like an oven or a fridge inside. Insulation keeps temps stable, stops rust, and saves energy. Not sure how to insulate a shipping container or what to use? Don’t worry—we’ll walk you through the best materials, smart methods, storage tips, and actual costs for both 20ft and 40ft containers.
Why Insulation for Shipping Containers Is So Important
Insulation isn’t just about comfort—it’s what makes your container space functional year-round. Whether it’s a home, office, or pop-up shop, here’s what proper insulation actually does:
Temperature control
Keeps the inside cool in summer and warm in winter, so you’re not stuck sweating or freezing every time the weather shifts.
Moisture protection
Stops condensation from building up on walls and ceilings—a big deal, since trapped moisture can lead to rust and mold over time.
Energy efficiency
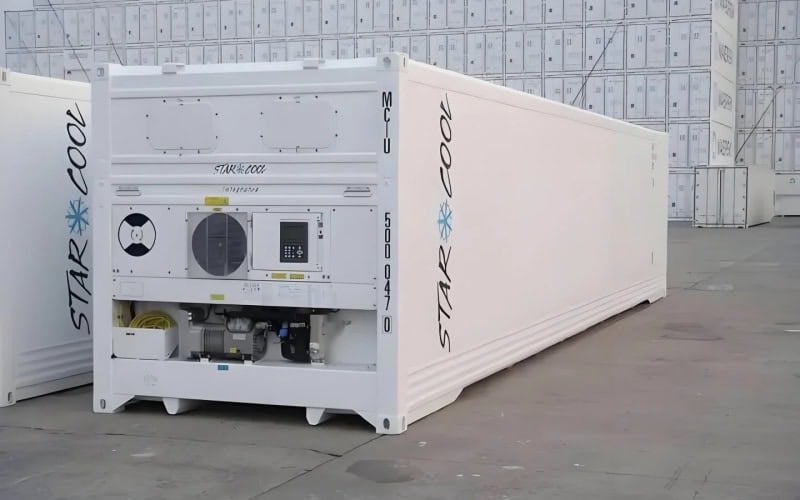
Helps you use less energy on heating and cooling. That implies reduced expenses and a more enduring area altogether. By the way, many refrigerated containers already come insulated—we often suggest repurposing one of these for tiny homes to save both time and money.
Soundproofing
Reduces outside noise and makes the space feel quieter inside. If the hollow “thud-thud” sound when walking in a container drives you crazy, insulation is the easiest fix.
Longer lifespan
Insulation helps protect the container’s metal shell from damage caused by sudden temperature changes.Without its presence, the steel can undergo expansion and contraction over an extended period, resulting in fractures, distortions, or even the weakening of its structural integrity.
These benefits really make a difference, no matter how you plan to use your container.
Best Insulation Materials for Shipping Containers
The best way to insulate a shipping container starts with choosing the right material—and that choice depends heavily on your climate, usage, and budget. Some materials are better for moisture control, while others are ideal for soundproofing or long-term durability.
Here’s a quick comparison of the most commonly used insulation materials:
| Material | Key Features | Ease of Installation | Durability | Price Range (USD/sq.ft.) |
| Spray Foam | Expands into a dense yellowish foam, air-tight, moisture-resistant | Moderate | 20–30 years | $1.00–$2.50 |
| Rigid Foam Panels (XPS, Polyiso) | Lightweight solid boards, usually white, blue, or gray, with high R-value | Easy | 15–25 years | $0.80–$1.80 |
| Mineral Wool | Dense, fibrous batts in gray or off-white, fire-resistant and soundproof | Moderate | 20+ years | $0.60–$1.20 |
| Fiberglass Batts | Soft, fluffy rolls in pink or yellow, budget-friendly and widely used | Easy | 10–15 years | $0.40–$1.00 |
| Eco-friendly Options(e.g., cotton, sheep wool) | Natural fiber mats, typically gray, breathable and non-toxic | Varies | 10–20 years | $0.80–$2.00 |
| Reflective Foil Insulation | Thin shiny foil sheets, often silver-colored, reflects radiant heat | Easy | 10–15 years | $0.30–$0.80 |
| Insulated Panels (SIPs) | Pre-fabricated rigid panels, sandwich core, clean white or gray surface | Moderate to hard | 30+ years | $2.50–$4.00 |
| Cellulose Insulation | Loose-fill gray fibers, made from recycled paper, treated for pest resistance | Moderate | 10–20 years | $0.60–$1.50 |
Tip: If you’re working with limited wall space or aiming for a slim interior profile, reflective foil and insulated panels are great space-saving solutions. Just make sure you also manage moisture properly—thin layers don’t always mean better performance on their own.
How to Insulate a Shipping Container: Based on Purpose and Climate
The optimal method for insulating a shipping container hinges on its intended use and location. Interior insulation is easier but takes up space; exterior options save space but need better sealing. Portable units do better with lightweight materials, while permanent builds can handle thicker layers. Climate matters too—snow, wind, and humidity all affect how insulation performs.

Insulating Container Walls
Insulating container walls takes the most work—and it’s where mistakes show up fast. Since the steel surface is corrugated, you’ll need to prep the wall before adding insulation.
First, install a vapor barrier directly over the metal, especially in humid climates, to keep moisture out. Then choose your insulation method:
- Rigid foam boards can be glued straight to the vapor barrier or slotted between vertical framing if you prefer a more structured wall.
- Mineral wool or fiberglass batts need framing—set studs at even spacing, then fill the cavities without compressing the material.
- Spray foam can be applied directly to the steel or over a barrier. It expands to seal gaps and works well in corners or uneven spots.
Finish with moisture-resistant panels like plywood or cement board, attached to your framing.
Key tips to remember:
- Use a vapor barrier to prevent trapped moisture.
- Insulate tightly around windows and doors—they’re common weak points.
- Avoid thermal bridging by keeping framing off the steel surface.
- Seal all joints and gaps before covering the walls.
- In cold climates, add a thin foam layer directly to the steel before framing for better heat protection.
Pro tip: A combo method—like spray foam in tricky spots and boards on flat walls—often gives the best results without wasting space.
Insulating the Roof of a Shipping Container
The roof takes the most sun and loses the most heat—insulating it properly is key to year-round comfort. Before starting, inspect for rust, dents, or leaks. Seal any damage to avoid trapping moisture under the insulation.
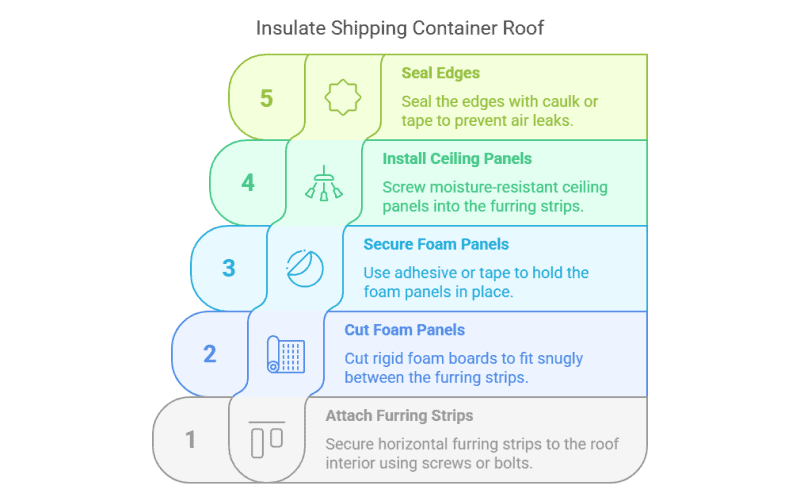
If you’re using rigid foam panels, start by attaching horizontal furring strips (wood or metal battens) directly to the roof’s interior using self-tapping screws or bolts rated for steel. Space them evenly—usually 16 to 24 inches apart—depending on your panel size.
Next, cut the rigid foam boards to fit snugly between the strips, ensuring full contact with the vapor barrier or steel surface behind. Utilize building adhesive or foam-compatible tape to secure them in position if required.
Once the insulation is set, screw moisture-resistant ceiling panels—like plywood or fiber cement board—into the furring strips, covering the entire roof and sealing the edges with caulk or tape to prevent air leaks. This provides you with a sturdy, completed ceiling that incorporates a thermal barrier between the steel and the indoor space.
In snowy regions, consider adding a sloped roof structure. This allows for exterior spray foam or insulated roof panels, and helps snow slide off instead of building up.
Key tips to remember:
- Always repair rust or leaks before insulating.
- In hot areas, even a thin reflective foil can cut heat fast.
- Leave ventilation gaps if layering insulation.
- Use fire-rated insulation for exposed roofs.
- For rooftop access, choose materials that support extra load.
Pro tip: Combining spray foam in seams and rigid panels on flat areas gives solid performance without overcomplicating the build.
Insulating the Floor
Container floors are easy to overlook, but they’re a major source of heat loss—especially when elevated off the ground. Unlike walls or ceilings, floors also carry weight, so insulation must be both strong and moisture-resistant.
For elevated containers, clean and seal the underside of the steel deck. Then apply rigid foam or closed-cell spray foam, and cover it with treated plywood or steel mesh to protect against weather and pests.
For containers on a slab, lay rigid foam panels directly over the steel floor. Seal all seams with tape, then add a plywood or OSB subfloor before finishing with your flooring.
If you’re retrofitting an existing floor, remove it if possible. Insulate beneath with spray foam or fitted panels, then reinstall new boards.
Pre-insulated steel floor panels are also a great option in prefab builds—they save time and offer consistent thermal performance.
Key tips to remember:
- Always seal the steel base before insulating.
- Use compression-resistant materials for durability.
- Protect underside insulation from moisture and pests.
- Add a vapor barrier in cold or damp areas.
- Seal every edge to prevent heat loss and drafts.
Pro tip: Don’t forget to plan for height—floor insulation adds thickness, which can affect doors and ceiling clearance.
Steps to Insulate a Used Shipping Container House
Ideally, insulation comes before electrical and plumbing. But if you’re working with a second-hand container home that’s already built, you’ll need to work around the existing systems. Here’s how to go about it safely and effectively:
- Inspect the existing interior
Look for mold, moisture stains, or exposed metal. Remove any damaged panels or coverings, especially around the floor and corners where condensation collects. - Plan around pipes and wires
If utilities are already installed, trace them carefully and plan to insulate around—not over—them. In some cases, small adjustments like re-routing a wire slightly can give you cleaner insulation coverage. - Choose thinner insulation where needed
If you’re tight on space, use rigid foam or reflective foil in areas with wiring, and save thicker insulation for open wall cavities. - Add a moisture barrier
Especially for older units, we always suggest installing a vapor barrier first—on walls and ceiling—to prevent hidden condensation from causing rust or mold behind the insulation. - Install framing if needed
Many containers don’t have enough depth to support insulation directly. A simple wooden or steel frame lets you add insulation safely, and creates a base for interior panels. - Seal every edge
Use spray foam or sealant to close all gaps between panels, around corners, and anywhere metal is still exposed. This phase is frequently overlooked, yet it significantly impacts thermal efficiency. - Finish with interior panels
Plywood, fiber cement board, or any moisture-resistant interior finish can be added last. Make sure it’s not pressing tightly against electrical conduits or plumbing.
Tip: We’ve found that mixing insulation types often works best in these retrofits—for example, spray foam in corners, and panels on large flat surfaces. That way, you don’t sacrifice performance or space.
Climate-Specific Tips for Shipping Container Insulation
Where your container lives really shapes how you should insulate it. Different climates call for different materials and methods—here’s how to adapt your approach based on the environment:
- Cold/Snow Regions
Go with thicker insulation on all sides, and prioritize closed-cell spray foam on the roof and walls for an airtight thermal barrier. A sloped roof design helps snow slide off, and you should also insulate around doors and floor edges, where cold air tends to creep in. - Hot/Desert Areas
Use reflective foil or radiant barriers to block intense sun and reduce radiant heat. Pair this with lightweight foam and cross-ventilation—even small roof vents can make a big difference in keeping the space livable. - High Wind Areas
Stick to durable insulation like structural panels that won’t peel or degrade under pressure. Reinforce exterior layers with proper fasteners, and seal every joint tightly to prevent drafts during strong gusts. - Tropical/Humid Zones
Moisture control is the main concern. Use breathable insulation like mineral wool with a solid vapor barrier to prevent mold. Also, leave space for airflow behind wall panels to avoid trapping condensation in hot, wet environments.
No matter your climate, the smartest insulation plan balances material performance with build practicality—so always match your insulation choices to both your local conditions and your container’s layout.
How to Store Leftover Shipping Container Insulation
Insulation materials aren’t cheap—so storing what you don’t use properly can save you money on future fixes or small additions. Here’s how to keep different materials in good shape for later use.
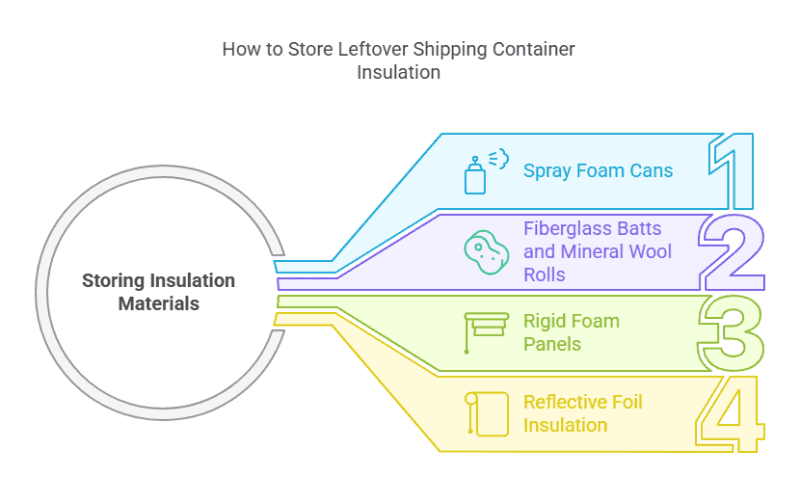
Spray foam cans should always be stored upright and sealed tightly, preferably at room temperature. Once opened, most cans only last a short time, so it’s best to use them up quickly or seal them with the manufacturer’s cap and tape to limit air exposure.
Fiberglass batts and mineral wool rolls need to be kept dry and clean. Wrap them in plastic sheeting or their original packaging, and place them on a raised surface to avoid ground moisture—especially if stored in a garage or shed.
Rigid foam panels are more durable but can warp or degrade if exposed to direct sunlight or moisture. Arrange them horizontally in a shaded, adequately ventilated location, and refrain from placing heavy items atop them to avert bending.
Reflective foil insulation should be rolled loosely and stored in a dry place. Sharp bends or tight rolls can crease the foil, which reduces its performance later.
Pro tip: Label what you’re storing and note where it was used—it’ll make your life much easier if you ever need to match materials later.
How Much Does It Cost to Insulate a 20ft or 40ft Shipping Container Home?
The cost of insulation for shipping containers can vary widely depending on your layout, location, and choice of materials. Whether you’re planning to DIY or hire a contractor, it’s helpful to understand the general range.
| Container Size | Basic Cost Range (DIY) | Professional Installation |
| 20ft (single unit) | $1,000–$2,500 | $2,500–$4,000+ |
| 40ft (double unit) | $2,000–$4,500 | $4,500–$7,000+ |
These prices generally include materials like spray foam, rigid boards, or mineral wool, along with vapor barriers and basic framing. DIY is more affordable, but it takes time, tools, and skill—especially when working around windows or wiring.
Professional installation costs more, but you’ll get better sealing, faster results, and fewer issues long-term. In cold or humid areas, this can help prevent mold or heat loss down the line.
Keep in mind, prices vary by region—labor rates, climate needs, and material access all affect your final budget. It’s advisable to inquire with nearby suppliers for precise estimations.
In our experience, factory pre-insulation is a smart option, especially if you’re combining multiple containers. It saves time and keeps thermal performance consistent across units.
Final Thoughts: Making Smart Insulation Choices for Your Container Home
Insulation isn’t just an upgrade—it’s what turns a steel box into a livable, functional space. Whether you’re dealing with summer heat or winter cold, the right insulation brings comfort, energy savings, and long-term durability.
The best solution depends on your climate, layout, and how the space will be used. From spray foam to rigid panels, each option has its strengths, and real-world needs should guide your choices—not just the material specs.
With decades of prefab container experience, we’ve seen how smart insulation planning can make or break a project. That’s why we offer in-factory insulation solutions tailored to your climate zone, reducing on-site work and ensuring consistent performance.
Our container home designs integrate insulation with structural support from the start. That means less retrofitting, more consistency, and smoother installation on-site. We also help clients choose insulation materials that fit their local weather and energy goals—so the finished space performs exactly as it should.
Whether you’re building a cozy modular container home, a shipping container home office, or a shipping container shop, we’re here to help you insulate it right—from the frame up. Ready to build smarter? Let’s talk.
If you’re interested in learning more about the types of materials used to enhance the performance of your container home, check out our guide on Steel structure insulation for deeper insights into creating energy-efficient and durable container homes.