Let’s be honest—shipping containers first caught everyone’s attention because they’re cheap, sturdy, and easy to repurpose. The idea of turning one into a stylish, functional office? Sounds great in theory! But once you start planning, reality kicks in: How do you insulate it? What about ventilation? Will it meet building codes?
Building a comfortable, professional shipping container office isn’t as simple as placing a desk inside a metal box. From choosing the right container to handling utilities and interior finishes, there’s a lot to consider.
That’s where this guide comes in! We’ll guide you through each stage of the procedure—from arranging and authorizations to building and typical traps. Whether you’re a business owner looking for a budget-friendly workspace or a contractor setting up an on-site office, you’ll get the insights you need to build it right the first time.
Why Build a Shipping Container Office?
Shipping container offices are affordable, flexible, and quick to set up—without sacrificing durability. But do they suit your workspace perfectly? Here’s why many businesses are choosing them.
1. Lower Cost, Bigger Savings
Traditional office buildings cost a fortune to build. Container offices greatly decrease costs as the fundamental structure is pre-constructed. Alterations take place away from the site, minimizing labor and material outlays. Plus, most setups don’t require a full foundation, saving even more.
2. Quick and Easy Setup
A conventional office requires months to finalize, whereas a container office can be ready within weeks. Doors, windows, insulation, and wiring are installed before delivery, minimizing on-site work. This serves as an excellent choice for enterprises seeking a swift and trouble-free office setup.
3. Built to Last
Made from Corten steel, shipping containers resist rust, corrosion, and extreme weather. They withstand heavy rainfall, powerful winds, and extreme heat more effectively than numerous conventional materials. In contrast to wood, they don’t bend out of shape, decay, or necessitate frequent maintenance.
4. Portable and Relocatable
Need to move? Just load your office onto a truck and go. Whether expanding, relocating, or working on a temporary site, a container office moves with you. Traditional buildings don’t offer that kind of flexibility.
5. Customizable for Any Business
A shipping container isn’t just an empty box. You can create open workspaces, private offices, or meeting rooms—whatever fits your needs. Add large windows, built-in storage, HVAC systems, and modern finishes to make it comfortable and professional.
6. A Greener Choice
Shipping containers give new life to old materials. With solar panels, energy-efficient insulation, and eco-friendly finishes, they become sustainable workspaces. Many businesses prefer greener buildings, and a container office checks that box.
Done right, a shipping container office is affordable, durable, and tailored to your needs. Next, let’s look at how to build one the right way.
Steps to Building a Shipping Container Office
Building a shipping container office takes more than just buying a container and adding furniture. From permits to final setup, every step matters. Here’s how to do it right.
1. Obtain Necessary Permits
Shipping container offices don’t always follow the same rules as homes, and local regulations vary. Before starting, check with local authorities to avoid unexpected issues.
What to Verify:
- Zoning Laws – Some areas restrict commercial container structures or require special approval.
- Building Codes – Fire safety, accessibility, and insulation must meet regional standards.
- Utility Connections – Electrical, water, and drainage must comply with local regulations.
Skipping permits can lead to fines, legal trouble, or forced removal. A brief phone call to your municipal planning department saves time and averts potential future issues.
2. Design Your Container Office
An exceptional office doesn’t emerge spontaneously—it’s deliberately planned. Prior to altering your container, allocate time to contemplate how the space will operate on a daily basis. A well-designed layout improves comfort, boosts productivity, and prevents costly mistakes down the road.
Define Your Office Requirements
Before cutting a single hole or installing any wiring, ask yourself:
- What is the number of individuals who will utilize the space? A single-person office has distinct requirements compared to a workspace meant for a small group.
- What features are essential? Do you need separate workstations, a meeting area, or built-in storage? Skipping this step can lead to a cramped, inefficient layout.
- What utilities are required? Will you need HVAC, high-speed internet, and plumbing for a restroom or kitchenette? Planning this now prevents expensive retrofits later.
Select the Right Container
- Size Matters – A 20ft container is perfect for a personal office or a small workspace. A 40ft container offers more room for multiple desks, storage, or a conference space. Need even more room? Multiple containers can be combined for a larger layout. If you’re wondering how big a shipping container actually is, standard units are typically 8 feet wide, 8.5 feet high, and either 20 or 40 feet long—though high-cube versions offer extra vertical space.
- New vs. Used – New containers come in pristine condition, ensuring no rust, dents, or past contamination. They cost more but require less prep work. Used containers are budget-friendly but must be carefully inspected for structural integrity. Check for rust, deep dents, and previous chemical exposure—a cheap container isn’t a deal if it requires major repairs.
Plan Your Layout & Interior
- Measure Everything – Precision matters. Knowing the exact interior and exterior dimensions helps in planning furniture placement, storage, and movement space.
- Create a Floor Plan – Map out doors, windows, workstations, storage, and power outlets. A simple sketch is a good start, using design software like SketchUp or Floorplanner also can help visualize the space more accurately and make adjustments before construction begins.
- Optimize Lighting & Ventilation – Large windows, glass doors, and skylights bring in natural light, reducing energy costs and making the office feel more open. Poor ventilation leads to stuffy, uncomfortable workspaces, so consider air vents or a dedicated airflow system.
A thoughtfully arranged interior avoids unnecessary space utilization and guarantees that every bit serves a function.
Utility Planning
- Electrical – Identify where outlets, light fixtures, and internet connections should go. Think about daily needs—will you have multiple computers, printers, or other heavy-duty equipment?
- HVAC – Containers heat up quickly in summer and lose heat fast in winter. Options include mini-split air conditioners, electric heaters, or passive cooling strategies like shade structures.
- Plumbing – If your office needs a bathroom, kitchenette, or water supply, plan for pipe routing and drainage solutions. Will you connect to a main water line, or will a water tank be more practical?
A clear plan saves time and avoids expensive adjustments once construction begins.
3. Site Preparation & Delivery
A well-prepared site ensures stability, prevents structural issues, and extends the lifespan of your container office. Proper groundwork before delivery saves time and avoids costly adjustments later. Here’s how to get your site ready.
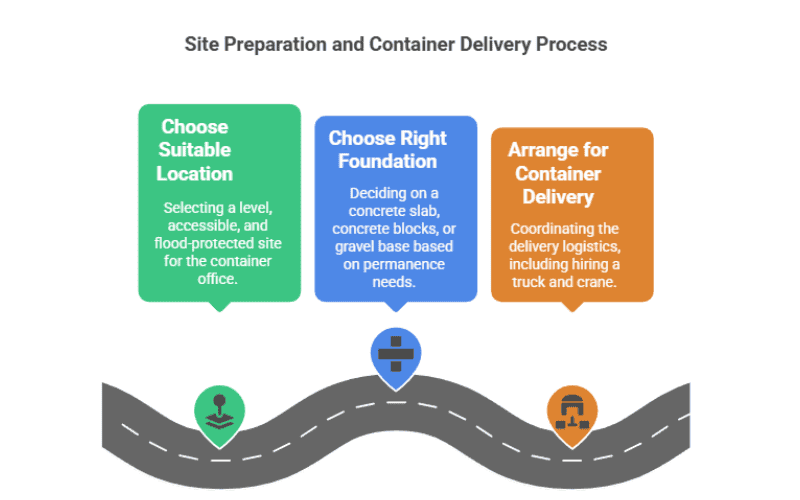
Choose a Suitable Location
Not all sites are ideal for a container office. Picking the right spot upfront prevents major issues later. Look for a location that is:
- Level and stable – Uneven ground can cause structural strain and doors or windows to misalign over time.
- Easily accessible – Ensure a truck and crane can reach the site without obstructions like trees, power lines, or narrow roads.
- Protected from flooding – Low-lying areas collect water, which can lead to rust and foundation instability. Choose a spot with good drainage.
- Flexible for future expansion – If you plan to scale your workspace, pick a site with enough room to add more containers or features.
If you’re unsure about the ground conditions, consider hiring a site surveyor to assess soil stability and drainage before moving forward.
Choose the Right Foundation
Choosing the right shipping container foundation is essential for long-term stability. A solid foundation prevents shifting, sinking, and water damage, especially in long-term installations. Here are the three most common options:
| Foundation Type | Best For | Pros | Cons |
| Concrete Slab | Permanent offices | Extremely stable, protects from moisture | Requires more prep work and cost |
| Concrete Blocks | Budget-friendly option | Quick to install, cost-effective | May shift over time if not properly leveled |
| Gravel Base | Temporary or mobile setups | Improves drainage, easy to remove | Less structural support, may require re-leveling |
If your container office is permanent, a concrete slab is the best choice. For a temporary setup, a gravel base or concrete blocks provide stability while keeping relocation an option.
Arrange for Container Delivery
Once your site is prepped, it’s time to coordinate delivery and placement. Proper handling prevents damage and ensures a smooth setup.
- Hire a truck and crane – Containers are heavy, and professional transport ensures safe delivery. Standard 20ft containers weigh around 5,000 lbs (2,268 kg), while 40ft containers can exceed 8,000 lbs (3,628 kg).
- Clear the delivery path – Remove any obstacles like fences, trees, or debris that might interfere with unloading.
- Confirm placement before arrival – Once the container is set down, moving it again can be expensive and time-consuming. Have a precise placement plan ready.
- Inspect before accepting – Before the delivery team leaves, check the container for damage, rust, or dents that might have occurred in transit.
A well-prepared site and smooth delivery process ensure your container office is stable, secure, and ready for the next phase of construction.
4. Construction & Modifications
Turning a shipping container into a fully functional office takes careful planning and precise execution. This phase involves cutting openings, reinforcing the structure, installing insulation, and adding essential utilities. Each alteration influences comfort, longevity, and productivity, thus it’s crucial to execute it correctly from the outset.
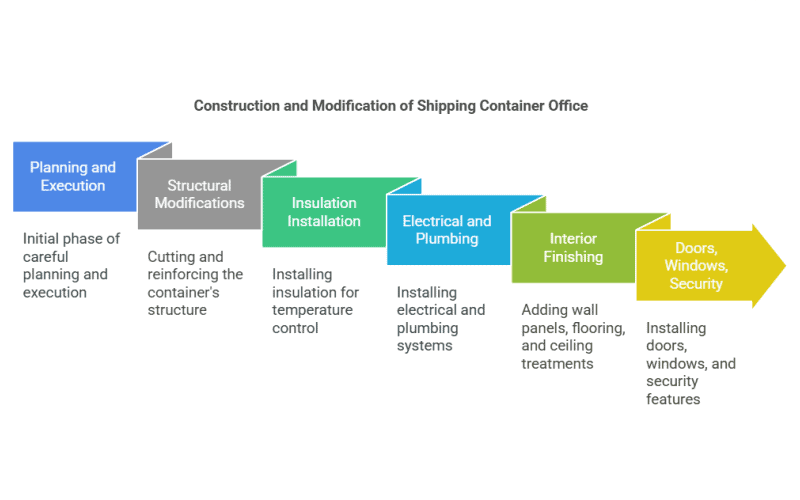
Cutting & Structural Modifications
Before adding anything inside, the container needs proper modifications for doors, windows, and ventilation. Cutting into the steel structure must be done carefully to avoid weakening the container’s integrity.
- Utilize a plasma cutter or angle grinder to create openings for doors and windows. These instruments offer neat and accurate cuts, guaranteeing that frames fit snugly.
- Reinforce cut areas with steel framing by welding square tubing or C-channel beams around door and window openings. This restores structural integrity and prevents warping, as containers rely on their corrugated structure for stability. Skipping this step can lead to flexing and weak points over time.
Skipping reinforcement may seem like a shortcut, but in the long run, it can lead to weak spots and reduced durability.
Insulation & Temperature Control
Metal containers retain heat during summer and lose it during winter, rendering insulation indispensable. The right insulation keeps the office comfortable, energy-efficient, and soundproof. Many of the same principles apply when learning how to insulate a shipping container home—choosing the right material and installation method is key to long-term comfort and efficiency.
| Insulation Type | Pros | Cons | Installation Method |
| Spray Foam | Best for climate control, creates an airtight seal | Higher cost, requires professional installation | Spray directly onto interior walls, ceiling, and floor for full coverage |
| Foam Board | Budget-friendly, easy to install | Needs vapor barriers to prevent moisture buildup | Cut to size and attach to walls using adhesive or mechanical fasteners |
| Fiberglass | Affordable and widely available | Requires an interior covering like drywall | Fit between wooden or metal framing, then cover with drywall or paneling |
For extreme climates, spray foam is the best choice because it prevents moisture buildup and regulates temperature effectively. If on a budget, foam board or fiberglass insulation still provide decent thermal protection but require additional layers for durability.
Electrical & Plumbing Installation
Before finishing the walls, all electrical and plumbing systems must be installed properly. Adding these later can be costly and labor-intensive.
- Run wiring for lighting, outlets, and internet through conduit pipes before wall panels are installed. This keeps everything hidden and protects the wiring from damage.
- Plan for high-power usage areas like workstations, printers, and HVAC units. It’s better to have extra outlets than too few.
- If plumbing is needed, install pipes for sinks, restrooms, or a kitchenette. Decide if the office will connect to a main water line or use a self-contained system with a water tank and pump.
Hiring a professional electrician and plumber is recommended, as mistakes in this stage can cause serious safety hazards or costly repairs later.
Interior Finishing
Once insulation and utilities are installed, it’s time to make the office look and feel professional.
- Wall panels or drywall create a polished, office-like appearance and improve insulation.
- Flooring options vary depending on durability and aesthetics:
- Vinyl flooring – Durable, waterproof, and easy to clean.
- Laminate – Cost-effective, with a wood-like finish.
- Epoxy coatings – Provides a seamless, industrial-style floor that resists wear and tear.
- Vinyl flooring – Durable, waterproof, and easy to clean.
- Ceiling enhancements such as acoustic tiles or reflective insulation aid in minimizing noise and regulating temperature.
A well-finished interior turns a basic container into a comfortable workspace that meets both aesthetic and functional needs.
Doors, Windows & Security
A good office needs natural light, proper ventilation, and strong security.
- Fit energy-saving windows and doors to lessen electricity usage and enhance ventilation. Double-glazed windows help with insulation and noise reduction.
- Add security features such as reinforced locks, security bars, and motion-sensor cameras. Although containers are inherently safe, incorporating these features wards off burglaries and unauthorized entries.
Good ventilation, ample lighting, and strong security make a big difference in daily comfort and usability.
Every modification in this phase plays a role in making your shipping container office functional, efficient, and long-lasting. Getting it right saves money on future repairs and ensures the office is ready for daily business operations.
5. Final Checks Before Move-In
Before settling into your shipping container office, a final inspection ensures everything is safe and functional. Here’s what to check:
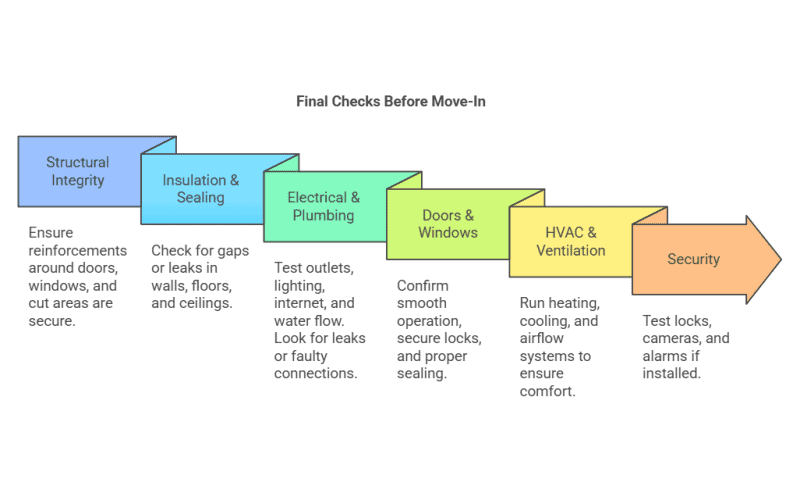
Once everything is in order, your office is ready for use!
Common Mistakes to Avoid When Building a Container Office
Even experienced builders run into challenges when converting shipping containers into offices. Here are some common mistakes and how to avoid them:
| Mistake | Problem | Solution |
| Skipping insulation | Office becomes too hot in summer and too cold in winter. | Apply spray foam, foam board insulation, or fiberglass insulation to maintain temperature and boost energy efficiency. |
| Poor ventilation | Leads to condensation, mold, and poor air quality. | Install windows, air vents, or HVAC systems to maintain airflow. |
| Weakening structural integrity | Cutting too many openings weakens the container’s strength. | Reinforce cut areas with steel framing to maintain stability. |
| Choosing a damaged container | Corrosion, dings, or prior chemical exposure may result in expensive repairs and safety hazards. | Inspect thoroughly and choose a structurally sound container before purchase. |
| Neglecting utility planning | Improper electrical, plumbing, and HVAC setups increase costs and cause inefficiencies. | Plan all utility installations before finishing walls. |
| Overlooking site preparation | Placing a container on unstable ground can cause shifting and drainage issues. | Use a concrete slab, concrete blocks, or a gravel base for a stable foundation. |
| Ignoring local regulations | Can result in fines, legal issues, or forced removal. | Check zoning laws and building codes before starting construction. |
| Not securing the office | Standard container locks aren’t enough to prevent break-ins. | Install reinforced locks, motion sensors, and security cameras for protection. |
Avoiding these mistakes ensures a durable, functional, and comfortable container office. Collaborating with a seasoned steel fabricator can streamline and enhance the process’s efficiency.
Why Choose a Professional Container Office Builder?
Building a shipping container home office sounds simple, but getting everything right—from insulation and wiring to security and structural reinforcements—can be challenging. At SteelPRO PEB, we take the guesswork out of the process with fully customized, move-in-ready container offices designed for durability, comfort, and efficiency. No unexpected modifications, no delays—just a high-quality workspace built to fit your needs.
Our prebuilt shipping container home office solutions come with fully installed electrical and plumbing systems, insulated walls, durable flooring, and custom upgrades like skylights, waterproof coatings, and flexible layouts. Whether you need a compact 20ft office or a custom multi-container setup, we ensure a smooth, hassle-free experience. Contact us today to get started on a cost-effective, ready-to-use workspace!