If you’ve got a shipping container home in a rainy or snowy region, you’ve probably already noticed one big issue—the flat roof tends to sag toward the center over time. Without a proper upgrade, your container home can run into serious drainage and structural problems. The good news? A new roof doesn’t just fix that—it also opens the door to better design, insulation, and outdoor living options.
Not sure if you’re ready to tackle a DIY container roof? No worries—this guide covers every type of container roof out there, with key DIY tips to help you steer clear of costly mistakes. Whether you’re going for style, weather protection, or more usable space—we’ve got the process, the tools, and the ideas to help you dive in with confidence.
Must-Have Tools and Materials for a DIY Shipping Container Roof
Before you dive in, you’ll need a solid lineup of tools and materials to get the job done right. Here’s your DIY starter pack:
- Wood framing material (pressure-treated 2x4s or 2x6s for framing, plus engineered wood like LVL or PSL for added structural strength)
- Shipping container roof brackets (custom or off-the-shelf brackets designed to mount frames to container sides)
- Angle brackets and truss connectors (including steel angle iron, metal plates, hurricane ties—used to attach trusses securely and resist wind loads)
- Purlins (metal or wood beams that run horizontally across trusses to support roofing panels)
- Metal roofing sheets or shingles (galvanized steel, coated panels, or asphalt shingles depending on roof type)
- Welding machine (for attaching steel components to the container, especially brackets or angle iron)
- Drill and screws / Bolts with washers (for securing wood, brackets, and metal sheets)
- Measuring tape and level (to ensure accuracy during layout and framing)
- Roof sealant and waterproof membrane (for sealing gaps and protecting from moisture)
- Ventilation grilles or soffit vent kits (to promote airflow and prevent condensation buildup)
Quick tip: Don’t just grab the cheapest tools off the shelf—using the right brackets, fasteners, and welding gear makes all the difference. Trust us, it’s way less stressful when everything actually fits and holds up.
Key DIY Principles to Avoid Damaging Your Shipping Container Roof
Before picking a roof style, it’s smart to go over a few key rules that’ll keep your container safe and solid. These are based on what actually works—not just theory.
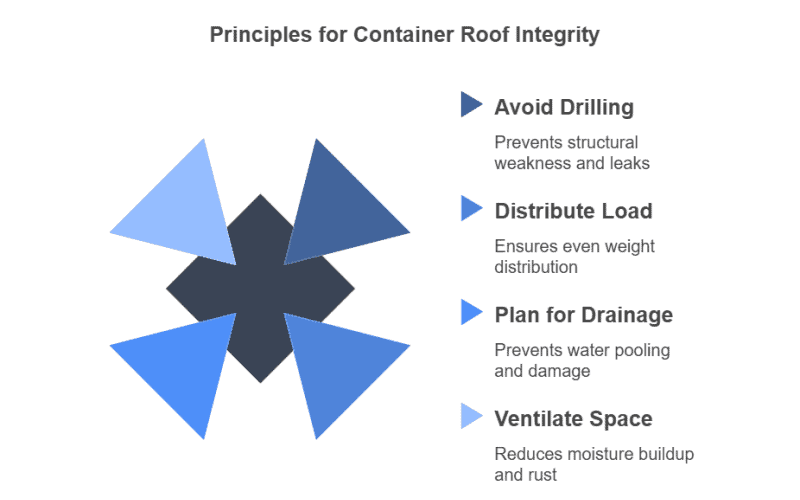
Don’t Drill Into the Roof If You Can Avoid It
The top of the container isn’t built to hold screws—it’s made to carry weight through the corners.
So instead of poking holes where they don’t belong, work around it.
- Attach brackets to the top rails or corner posts—not the middle of the roof.
- Build a frame that sits over the roof using side brackets or welded angle iron.
- If you really need to drill, seal it up right away with rubber washers and tape.
Distribute Roof Load Evenly Across the Container
We’ve seen roofs sag or frames bend just because the weight wasn’t spread out.
The fix? Make sure your support beams do the heavy lifting.
- Use at least 3–4 purlins across small spans—more if the roof is big or heavy.
- Every truss or rafter should send its weight to both walls—not just one side.
- Use strong connectors at joints so things don’t shift or crack over time.
Plan for Water Drainage and Thermal Expansion
Even a good roof will leak or warp if water pools or the metal heats up too much.
That’s why slope and flexibility matter more than you think.
- Tilt the roof at least 5–10° so water runs off fast.
- Use flexible sealants around screws to handle heat changes.
- Add drip edges or gutters to keep water away from the base of the container.
Wondering how well your container will hold up in heavy rain? Learn more about are shipping containers waterproof and how to enhance their resistance with the right roof design.
Ventilate the Roof Space to Prevent Moisture Buildup
Hot, trapped air causes rust, mold, and swelling—especially with wood inside.
Ventilation helps your roof breathe, and that makes all the difference.
- Add soffit vents under both sides of the roof; a ridge vent works great too.
- For attic-style roofs, put gable vents on each end for airflow.
- Leave at least a 1-inch air gap under the roof, and cover it with mesh to block pests.
11 DIY Shipping Container Roof Ideas and How to Build Them
Now that you’ve got the key principles down, let’s explore 11 roof styles that work great on shipping containers. These aren’t just design ideas—they’re fully buildable, and when done right, won’t damage your container.
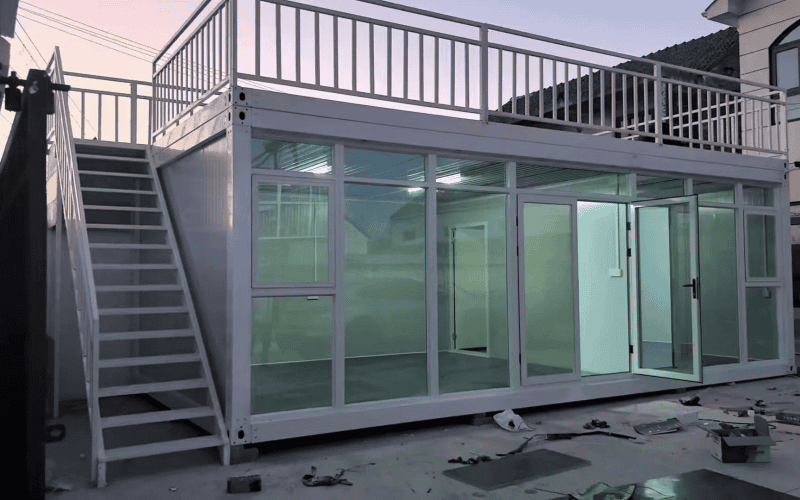
Shipping Container Roof Deck
Why choose it: A roof deck adds a raised protective layer that shields the original roof from long-term water pooling and UV exposure, helping to prevent sagging and corrosion.
To start, weld or bolt steel posts into the four corner castings of the container, letting them rise a bit higher than the roofline. These posts act as the primary frame for your deck.
Next, lay wood or metal joists across the frame, evenly spaced to support decking boards. Composite or pressure-treated decking works well for weather resistance.
Finally, apply a waterproof membrane over the container roof before building anything above it. This protects the original roof from moisture damage. Don’t forget to add railings and stairs or a ladder for safe access.
Wood Shipping Container Roof
Why choose it: A raised wood-framed roof reduces direct impact from rain or snow and creates space for insulation, keeping your container dry and temperature-stable inside.
Start by securing heavy-duty brackets to the container’s long sides, then fasten pressure-treated beams to form your base frame. Make sure the frame sits slightly above the container roof to allow airflow.
From there, attach plywood or OSB sheathing, followed by a vapor barrier and insulation. Finish with shingles or metal panels, depending on your style and budget.
It’s best to keep overhangs short but effective for rain protection. If you’re in a humid area, good ventilation below the roof is a must.
Shipping Container Barn Roof
Why choose it: The barn-style pitch provides strong water runoff and protects the flat container roof from rain accumulation that can lead to rust or sagging over time.
Begin by welding angle steel plates to both long edges of the container, just above the top rail. These will support the wood beams that anchor your roof frame.
Then, bolt on barn-style trusses. These create a wide, pitched profile and can be pre-cut for easier assembly. Install purlins across the trusses to support your roofing panels—galvanized metal works best here.
For best results, include wide overhangs for shade and splash protection, especially in areas with heavy rainfall.
Shipping Container Gambrel Roof
Why choose it: This double-slope roof style improves drainage while offering attic space—reducing the risk of water pooling and allowing better insulation control inside the container.
Just like with a barn roof, start by securing support beams along both container sides, using brackets or angle iron.
Install gambrel-style trusses, which include a lower steep section and a higher shallow slope. Connect trusses with purlins and top with metal or shingle roofing.
Gambrel roofs add character, but remember to reinforce all connections, especially at the transition between the two slopes.
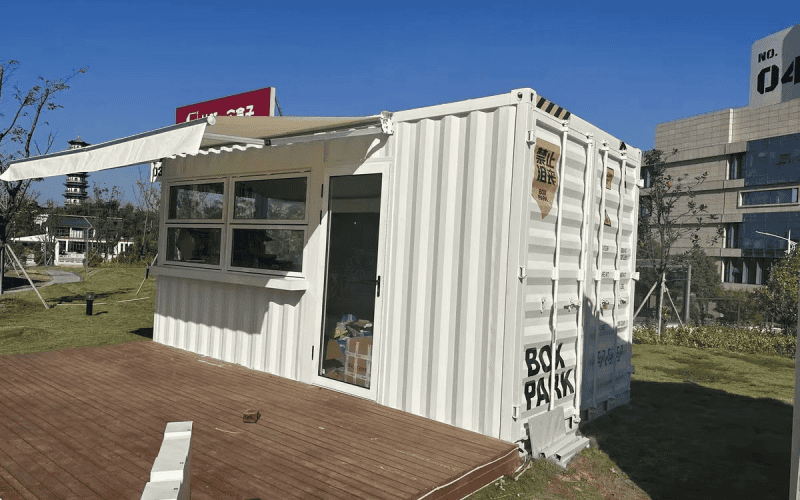
Shipping Container Awning Roof
Why choose it: An awning roof diverts rain away from doors and windows and shades the container walls, protecting both the openings and siding from moisture damage and heat stress.
First, attach steel brackets to the top edge of the container wall—usually just above the door or along one long side. These support the outward extension.
Extend light steel or wood beams at an angle, then cover the slope with metal or polycarbonate panels. Keep the angle shallow enough to block sunlight but steep enough for rain runoff.
If needed, add gutters along the outer edge to guide water away from the container base. It’s a simple build with a big impact.
Shipping Container Gable Roof
Why choose it: A gable roof adds slope and ventilation space above the container, which helps eliminate water buildup, improve drainage, and reduce the risk of mold and rust inside.
Begin by welding vertical angle brackets to both sides of the container, then mount your wood beams across these points to form the base frame.
From there, install gable trusses evenly along the span and fasten them securely to the beams. Add purlins on top, followed by metal panels or shingles.
Make sure to add soffit vents under the eaves and a ridge vent if possible, especially if you plan to insulate the roof cavity.
Shipping Container Canopy Roof
Why choose it: A canopy roof creates a detached barrier between the sun or rain and your container roof, helping reduce heat buildup, surface wear, and moisture accumulation without altering the container itself.
To build a canopy roof, start by installing a freestanding steel or wood frame that covers the container without making direct contact. This helps protect the container’s structure from added stress or damage.
Use anchored steel posts on the ground, positioned just outside the container footprint. Connect them with cross beams to form a stable roof frame.
Add roofing panels or fabric stretched over the top, depending on whether you’re going for full weather protection or light shade. This design is especially useful in hot climates where heat buildup on the roof becomes a major issue.
Shipping Container Hoop Roof
Why choose it: The curved shape of a hoop roof naturally sheds water and snow, protecting the flat container roof from long-term pooling, rust, or collapse in extreme weather.
To get started, attach pre-bent steel or PVC hoop frames directly to mounting brackets along the container’s top edges. These arches should rise high enough to allow slope for drainage.
Next, stretch tensioned tarp or heavy-duty fabric over the hoops, securing it tightly with straps or ropes. This creates a smooth, curved cover that flexes in the wind but holds firm in rain.
For more protection, add vertical end walls or fabric caps to close off the sides. This keeps the interior dry and makes the structure more stable during storms.
Shipping Container Fabric Roof
Why choose it: A fabric roof offers lightweight coverage that helps shield the container roof from UV damage, rain, and debris, especially for temporary or modular setups.
Start by choosing a prefabricated fabric roof kit that matches the container’s dimensions. These kits usually come with mounting plates, frames, and pre-cut fabric panels.
Weld or bolt the base plates to the container corners or side rails. These serve as the attachment points for the tension frame.
Once the frame is assembled, stretch the fabric over the top and secure it using tension cables or snap-lock systems. For windy areas, it’s smart to add side skirts or anchor the base for extra hold.
Green Roof on Shipping Container
Why choose it: A green roof helps prevent heat buildup, manages stormwater, and adds insulation—while also protecting the original roof from exposure to sun and weather.
To support the weight, you’ll need to reinforce the roof with steel beams or a wood grid frame that evenly distributes the load across the container’s edges, not the center.
Next, install a waterproof membrane, followed by a root barrier and drainage mat. These layers are essential to prevent water leaks and root penetration into the structure.
Add a lightweight soil mix and choose shallow-rooted plants like sedum or hardy grasses. Avoid anything too heavy or deep. And remember—regular drainage checks are a must to avoid water pooling beneath the soil.
Shipping Container Truss Roof
Why choose it: A truss roof creates a high-strength frame above the container that eliminates flat roof issues like water pooling and gives room for insulation, ventilation, and even ceiling finishes.
Start by bolting or welding brackets along both container side rails. These will support horizontal beams that anchor the trusses.
Next, secure steel or engineered wood trusses into place, making sure they overhang slightly for better runoff. Trusses should be spaced evenly and connected with strong gusset plates.
Then, attach purlins across the trusses and finish with metal sheeting or composite panels. Be sure to leave space for airflow at the eaves and add a ridge vent if you’re insulating the roof.
Final Thoughts: Building It Right with the Right Support
Whether you’re aiming for better insulation, more outdoor space, or just protecting your container from long-term wear, upgrading the roof is one of the smartest decisions you can make.
As a container building manufacturer, we’ve helped clients with everything from simple awning covers to fully engineered multi-span truss systems. Our expertise lies in helping you get the structure right from day one—not only making it look great, but ensuring it’s built to last and tailored to your actual needs.
When we design your container home, we take your local climate, possible future expansions, and functional preferences into account—so your roof is already optimized from the start. No need for costly redesigns or second-guessing later on. After all, roof design is not a separate add-on—it’s already part of the complete solution we provide.
Compared to going fully DIY, working with a manufacturer gives you a much smoother experience—and that starts with choices.
Here’s what we offer:
- Dozens of structural roof options to suit different spans, layouts, and architectural needs.
- Color, skylight, ventilation, and waterproofing integrations, all handled with precision.
- Custom brackets and prefabricated roof frames that match your container’s specs and save you time on site.
Ready to take the next step? Let’s make your container roof upgrade simple, strong, and 100% right from the beginning.