Imagine this: you’ve invested time and money into raising pigs, only to find they’re not growing as expected or falling sick frequently. The culprit? Poor housing. A well-built pig house isn’t just a shelter—it’s a foundation for healthy, productive pigs. Whether you’re a small-scale farmer or a homesteader, the right pig house can save you money, reduce labor, and ensure your animals thrive.
In this tutorial, we’ll lead you through all the essentials for constructing a swine shelter, ranging from straightforward DIY blueprints to sophisticated steel constructions. By the end, you’ll have the insights to choose the best option for your needs—and you might just see why more farmers are turning to steel structures for their pig houses.
What Makes a Good Pig House? Key Factors to Consider
Prior to commencing construction, it is vital to grasp what constitutes an excellent swine shelter. Pigs are sensitive to their environment, and poor housing can lead to stress, disease, and stunted growth. Here’s what you need to consider:
- Climate: Pigs need ventilation to prevent overheating and insulation to stay warm in winter.
- Space: Overcrowding can cause aggression and health issues. Allocate at least 8-10 square feet of space per pig within the resting area.
- Durability: Pigs are strong and curious, so your structure must withstand their natural behaviors.
- Ease of Cleaning: A well-designed pig house makes waste management simpler and more hygienic.
Here’s another clean, easy-to-read table for your pig house planning!
| Feature | Why It Matters |
| Shade & Shelter | Protects pigs from sunburn and sudden rain with roof extensions or shaded areas. |
| Predator Patrol | Secure latches and strong fencing keep raccoons/foxes out, especially at night! |
| Stay Dry, Stay Happy | Sloped floors or drainage ditches prevent muddy puddles—dry pigs stay healthier! |
| Let the Sunshine In | Adjustable windows/vents bring sunlight and fresh air without chilly drafts. |
| Plan for the Future | Removable walls or extra space allow room for a growing pig family. |
| Keep Pests Away | Elevate the house or add mesh screens to deter rats and flies. |
| Vet Visits Made Easy | Wide doors or removable panels simplify health checks. |
| Escape-Proof Locks | Heavy-duty bolts or carabiner clips stop clever pigs from nudging open doors! |
| Portable Pens | Portableportable pig shelter let you rotate grazing spots for fresher pastures and less waste. |
| Rain-Ready Roofs | Overhangs or gutters direct rainwater away from the living area. |
Love this checklist? Explore The Ultimate Pig Farming Housing Plan for step-by-step blueprints, budget hacks, and seasonal care strategies!
DIY Steps for Building Different Types of Pig Houses
Ready to get your hands dirty? Here’s how to build each type of pig house, step by step.
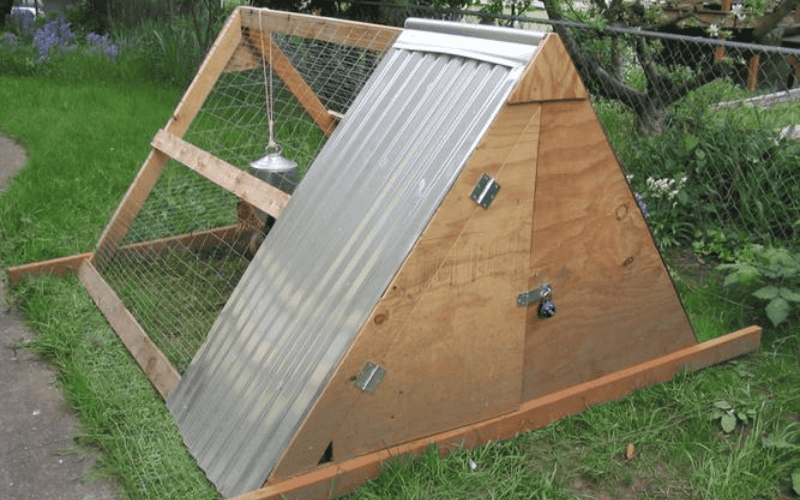
A-Frame Pig House
Ideal for beginners or temporary setups, the A-frame pig house is a simple, portable structure that provides basic shelter for pigs. It is typically constructed using wooden beams and covered with corrugated metal or a heavy-duty tarp. This design is affordable, easy to build, and movable, making it a popular choice for small-scale farms or rotational grazing systems. However, its limited space and durability can be a drawback, especially in areas with extreme weather conditions.
Now, let’s proceed with a step-by-step guide on constructing various types of swine shelters.
How to Build an A-Frame Pig House
Step 1: Design and Planning
Start by sketching out your A-frame structure. Aim for an 8×8 ft base and 6 ft height—this gives 2–3 pigs room to snuggle and stretch. Adjust for your herd! Consider including a hinged access door for easy entry and exit, and mark spots for adjustable vents near the roof peak (think: old window shutters or PVC pipes with caps).
Step 2: Gather Your Materials
Here’s what you’ll need:
- Frame: Use pressure-treated 2x4s for rot resistance. No saw? Ask the store to pre-cut lumber!
- Corrugated metal sheets or heavy-duty tarp for the roof
- Hinges for the door
- Nails, screws, and a drill for assembly
- Bricks or concrete blocks to elevate the structure slightly
- Floor: Skip concrete—elevated pallets covered with plywood keep pigs dry and let waste fall through.
Step 3: Build the Frame
Safety first: Wear gloves and goggles!
- Triangle Time: Cut two identical 8-ft baseboards and two 6-ft vertical beams. Assemble into triangles with galvanized screws.
- Lock It Down: Connect the triangles with horizontal beams at the base, middle, and peak. Use metal brackets for hurricane-proof strength! 🌪️
- Heads Up: Angle the front triangle slightly steeper than the back for better rain runoff.
Step 4: Attach the Roof and Walls
- Metal Roof: Attach with rubber-washered screws to prevent leaks. Too loud in rain? Line the inside with foam board for soundproofing!
- Tarp Option: Stretch it taut and secure with bungee cords for easy removal during cleanings.
- Ventilation: Cut a 4-inch gap along the top rear wall and cover with hardware cloth (keeps bugs out!).
Step 5: Add the Door and Finishing Touches
- Install a small door using hinges and a wooden frame, ensuring it is easy to open but secure enough to keep pigs inside.
- Elevate the structure slightly by placing it on bricks or concrete blocks to prevent flooding and improve drainage.
- Incorporate bedding substances such as hay or sawdust to establish a cozy resting spot for the pigs.
Extra Tips for Success
- Winter Ready: Staple bubble wrap insulation to walls—it’s cheap and traps heat!
- Summer Cool-Down: Drape a DIY shade sail (old bedsheet + grommets) over the roof.
- Portable Power: Add wheels to one side for easy moving—perfect for pasture rotation!
- For added durability, apply a weather-resistant sealant to the wooden frame.
- If you experience strong winds, use additional anchors like T-posts or ground stakes to prevent shifting.
- Consider adding a simple shade cloth over the A-frame to reduce heat exposure in summer.
With these simple steps, you’ll have a functional and portable pig house that provides a cozy and protective space for your pigs. Ready for the next level? Let’s explore more pig house designs!
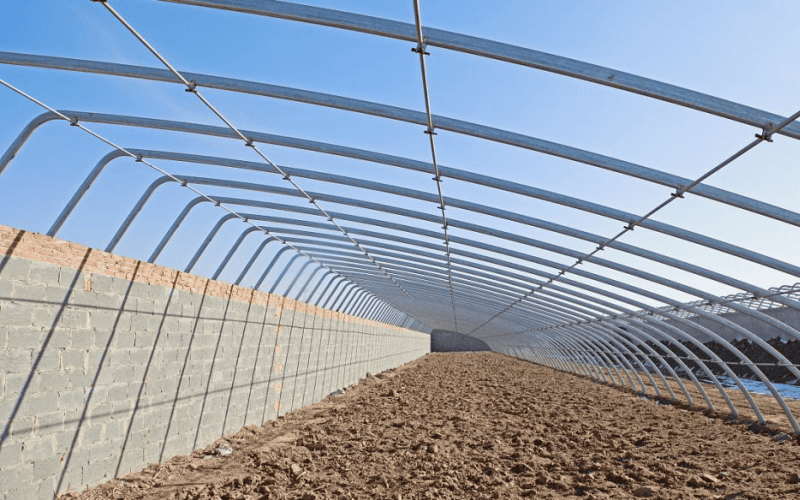
Hoop House
A step up from the A-frame design, the hoop house is a great option for farmers with medium-sized herds. It features a curved structure made from PVC pipes or metal hoops, covered with a tarp, and anchored with rebar for stability. This layout provides sufficient room, superior airflow, and economic efficiency, rendering it a feasible option for numerous swine breeders. However, it is less sturdy in high winds or heavy snow, which may require additional reinforcement in certain climates.
How to Build a Hoop House Pig Shelter
Step 1: Design and Planning
Start by determining the size of your hoop house. A 12×24-foot structure with a peak height of 8 feet is a good standard size, providing enough room for multiple pigs while maintaining easy access for feeding and cleaning.
Consider the placement of your hoop house: a slightly elevated, well-drained area is ideal to prevent water pooling inside. If you’re in a windy region, think about adding extra bracing or positioning it near a windbreak.
Step 2: Gather Your Materials
To build a sturdy hoop house, you’ll need:
- 1.5-inch diameter PVC pipes (or metal conduit for extra durability)
- UV-resistant tarp (heavy-duty for long-term use)
- Rebar stakes (2 feet long) for anchoring the pipes
- Wooden beams (2×6) for the base frame (optional for extra stability)
- Zip ties or strong rope to secure the tarp
- Sandbags or concrete blocks (for weighting down the edges)
Step 3: Build the Frame
- Mark your foundation area by outlining the dimensions of the hoop house.
- Drive rebar stakes into the ground at 4-foot intervals along both sides of the shelter’s length. These will serve as securing points for your PVC tubing.
- Bend the PVC pipes into an arch and slide each end over the rebar stakes, forming a series of evenly spaced hoops. If using metal conduit, use brackets to secure the hoops to the base.
- For extra stability, attach wooden beams along the base to connect the pipes and prevent shifting.
Step 4: Attach the Cover
- Drape the UV-resistant tarp over the frame, ensuring full coverage of the hoops.
- Secure the tarp with zip ties or strong rope, fastening it tightly to the base.
- Weigh down the edges with sandbags or concrete blocks to prevent flapping in high winds.
Step 5: Finishing Touches
- Add ventilation openings by cutting small flaps on the sides of the tarp, rolling them up, and securing them with ties when needed.
- Create an entrance using a reinforced wooden frame and a hinged door for easy access.
- Ensure proper drainage by placing the structure on gravel or raised ground.
Extra Tips for Success
✅ For better durability, use metal conduit instead of PVC. This makes the structure sturdier, especially in areas prone to storms.
✅ Use cattle panels instead of PVC hoops if you need an extra-rigid frame. These metal panels can handle more weight and wind.
✅ If you live in a snowy region, consider reinforcing the hoops with wooden or metal crossbeams to prevent collapse.
Permanent Wooden Pig Barn
For larger pig farming operations, a permanent wooden barn provides a durable, customizable, and spacious housing solution. Built using treated lumber for the frame, metal roofing for protection, and concrete flooring for easy cleaning, this structure ensures long-term stability and comfort for pigs. While it offers greater longevity and flexibility in design, it comes with higher upfront costs and a more labor-intensive construction process. However, for farmers looking for a reliable, long-term solution, a well-built wooden pig barn is a worthwhile investment.
How to Build Permanent Wooden Pig Barn
Step 1: Plan Your Layout Thoughtfully
A wooden pig barn isn’t just four walls and a roof—it needs to be functional. Design your barn with:
✅ Sleeping Areas – Dry, insulated spaces with ample room for each pig.
✅ Feeding Zones – Easy-access troughs and a dedicated space to prevent crowding.
✅ Waste Management Sections – Proper sloped flooring and drainage to keep the barn clean.
✅ Ventilation and Light – Windows, vents, or open sections to reduce humidity and odors.
✅ Expansion Space – If you plan to grow your herd, leave room for future additions.
Once the layout is finalized, you’re ready to start construction!
Step 2: Gather Your Materials
To ensure your barn is strong and durable, use quality, weather-resistant materials:
- Treated lumber for framing, walls, and interior dividers
- Concrete for a sturdy, easy-to-clean floor
- Metal roofing sheets for weather protection
- Ventilation windows or ridge vents for fresh airflow
- Heavy-duty hinges and locks for secure doors and gates
Pro Tip: Use pressure-treated wood for moisture resistance, preventing rot and insect damage.
Step 3: Lay a Strong Foundation
- Clear and level the building site – Choose an elevated area to prevent flooding.
- Dig and pour a concrete foundation – This makes cleaning easier and helps prevent disease.
- Add drainage channels – Proper waste flow keeps the barn dry and hygienic.
- Allow the concrete to set completely before proceeding to the subsequent stage.
Pro Tip: Slope the floor slightly toward drainage channels to prevent water pooling.
Step 4: Construct the Wooden Frame and Walls
- Install robust wooden poles around the boundary, anchoring them in concrete foundations for firmness.
- Connect horizontal beams to create a strong frame for walls and roofing support.
- Install wall panels, leaving space for doors, windows, and ventilation openings.
- Reinforce corners and load-bearing walls to handle the weight of the roof and strong pig activity.
Pro Tip: Use double-layered walls for better insulation in colder climates.
Step 5: Install Roofing and Insulation
- Attach roof trusses or rafters securely to the frame.
- Install metal roofing sheets, ensuring overlap to prevent leaks.
- Incorporate insulation material between the rooftop and the ceiling if your region experiences harsh weather conditions.
- Leave ventilation gaps or install ridge vents to maintain fresh airflow.
Pro Tip: Overhang the roof slightly to provide shade and rain protection at the barn entrance.
Step 6: Add Functional Features for Efficiency
- Install sturdy gates and partitions to separate different pig groups (breeding, weaning, etc.).
- Set up feeding and watering systems – Automatic feeders save labor and reduce waste.
- Add waste disposal solutions – A slatted floor with a pit system makes cleaning easier.
- Ensure proper lighting – Natural light reduces stress, but add LED lights for darker areas.
Pro Tip: Position feed and water sources away from sleeping areas to maintain hygiene.
Final Touches & Maintenance Tips
✅ Seal wood surfaces with a non-toxic, water-resistant coating to extend their lifespan.
✅ Apply pest control measures to prevent rodents from damaging structures.
✅ Regularly check for wear and tear – Inspect roofing, drainage, and wall stability.
✅ Consider automated climate control – Heaters or fans help keep pigs comfortable year-round.
With these steps, your wooden pig barn will be a durable, efficient, and pig-friendly structure that lasts for years. If you’re looking for an even stronger, low-maintenance option, let’s explore steel structure pig houses next!
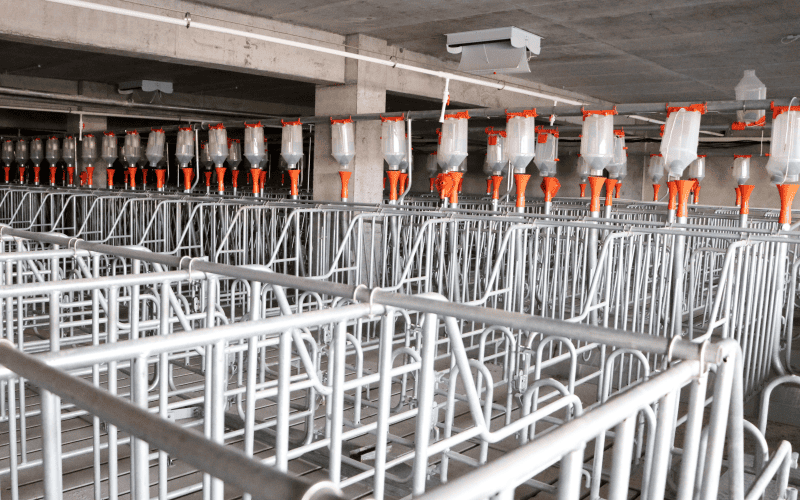
Steel Structure Pig House
The ultimate solution for modern pig farming, a steel structure pig house offers exceptional durability, scalability, and low maintenance. Constructed using prefabricated steel frames, insulated panels, and metal roofing, this design ensures a weather-resistant, easy-to-assemble, and highly customizable housing option. While the initial investment is higher, the long-term savings on repairs and maintenance make it a cost-effective choice for serious farmers looking for efficiency and longevity.
Now, let’s proceed step-by-step with constructing various kinds of swine shelters.
How to Build a Steel Structure Pig House
Step 1: Design and Planning
Unlike DIY wood or PVC structures, steel pig houses require careful planning and precision. It’s best to work with a prefabricated steel provider to customize dimensions, features, and ventilation needs. Consider the following:
- Size Requirements – How many pigs will it house? Ensure enough space for feeding, resting, and movement.
- Ventilation & Insulation – Steel retains heat, so proper ventilation, insulation, and airflow are key for pig comfort.
- Drainage & Flooring – A concrete foundation with drainage channels helps with waste management and hygiene.
- Expansion Potential – If you plan to scale up, design the structure with modular sections that allow for easy expansion.
Once the design is finalized, your prefabricated steel components will be delivered, ready for assembly.
Step 2: Gather Your Materials
To construct a durable steel pig house, you’ll need:
- Prefabricated steel frames (galvanized for rust resistance)
- Insulated wall and roof panels for temperature control
- Steel fasteners, bolts, and screws for secure assembly
- Ventilation systems (exhaust fans or natural ventilation windows)
- Concrete foundation materials (if required)
- Optional: Automatic feeders and watering systems for efficiency
Step 3: Assemble the Steel Frame
- Prepare the foundation – If using a concrete floor, pour and level it first, ensuring proper drainage slopes.
- Position the steel columns – Secure the upright supports to the base with robust bolts.
- Connect horizontal beams – Assemble the framework by attaching horizontal beams to form the skeleton of the structure.
- Secure all connections – Double-check that all joints are bolted tightly to prevent movement over time.
Pro Tip: Use galvanized steel for rust resistance and increased longevity!
Step 4: Install Walls and Roofing
- Attach the insulated wall panels to the frame, securing them with steel fasteners.
- Install the metal roofing panels, ensuring overlap for water runoff.
- Seal joints and edges to prevent leaks and drafts.
- Add ventilation features such as exhaust fans, ridge vents, or roll-up curtains for climate control.
Pro Tip: If situated in a warm region, choose reflective roof coverings to decrease heat accumulation.
Step 5: Add Functional Features
- Set up feeding and watering systems – Consider installing automatic feeders and nipple drinkers to reduce labor.
- Create waste management zones – Sloped floors and drainage channels help direct waste away efficiently.
- Install lighting and electrical systems – LED lighting and energy-efficient ventilation fans improve pig comfort.
- Add biosecurity measures – Foot baths, disinfection zones, and secure fencing help reduce disease risks.
Pro Tip: If you want extra efficiency, integrate solar panels for a self-sustaining energy source.
Extra Tips for Success
✅ Go modular – A modular steel pig house allows for easy expansion as your herd grows.
✅ Choose corrosion-resistant materials – Steel structures last longer when treated with anti-rust coatings.
✅ Optimize for airflow – Good ventilation reduces heat stress, odors, and respiratory issues in pigs.
✅ Ensure proper insulation – Poor insulation leads to temperature fluctuations, affecting pig growth and health.
With a steel structure pig house, you’re investing in efficiency, durability, and long-term savings. Whether you’re a small farmer expanding operations or managing a large-scale pig farm, this modern solution ensures better welfare, easier management, and higher productivity.
As a leading manufacturer of steel structure buildings, we provide custom-designed Steel Structure Pig Houses with galvanized steel frames, insulated panels, and optimized ventilation systems. Our prefabricated designs ensure strength, easy assembly, and long-term performance for a cleaner, safer, and more efficient pig farming environment.
Tips for Maintaining Your Pig House
A well-maintained pig house ensures your pigs stay healthy and your investment lasts. Here’s how to keep it in top shape:
- Clean Regularly: Remove waste daily and disinfect weekly to prevent disease.
- Inspect for Damage: Check for wear and tear, especially after storms or extreme weather.
- Control Pests: Use traps or natural repellents to keep rodents and insects away.
- Monitor Ventilation: Ensure proper airflow to prevent respiratory issues.
- Floor Check: Look for cracks (concrete) or warping (wood). Patch small gaps with rubberized sealant to stop moisture sneaking in.
- Roof Scan: After storms, hunt for loose screws on metal roofs or tears in tarps. A dab of flexible roof cement fixes leaks fast!
Why Steel Structure Pig Houses Are the Future
Building a pig house is more than just a DIY project—it’s an investment in your farm’s future. While A-frames and hoop houses are great for starters, steel structure pig houses offer unmatched durability, scalability, and low maintenance. As a leading prefabricated steel structure manufacturer, we’ve seen firsthand how these structures transform farms, from small homesteads to large commercial operations.
Our Steel Structure Pig Houses are designed to withstand harsh weather, reduce long-term costs, and provide a safe, comfortable environment for your pigs. Ready to take the next step? Contact us today to learn how we can help you build a pig house that stands the test of time.