Building a small monoslope cattle barn with a steel structure is one of the smartest investments a rancher can make today. Compared with traditional wood barns, a prefabricated steel monoslope barn offers faster construction, lower maintenance, and better airflow—all critical for herd health and cost control.
This guide walks you through every key step: from pre-construction planning (site orientation, permits, and budgeting with real factory kit pricing) to efficient building techniques that improve strength and assembly accuracy.
You’ll also learn why steel monoslope barns outperform traditional builds in both durability and long-term ROI—and how to partner with a trusted global manufacturer for a factory-direct solution that saves time and money.
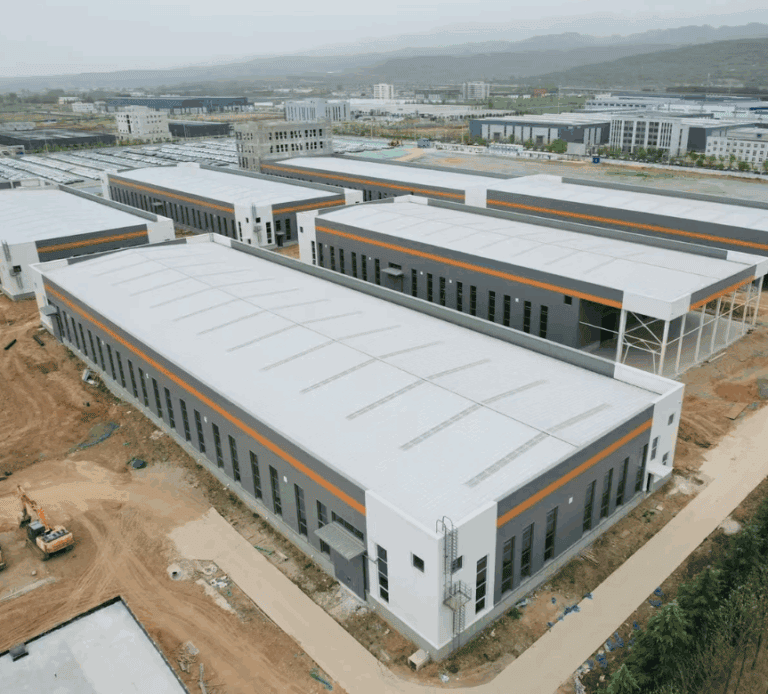
Engineered and manufactured by SteelPRO PEB, a certified steel structure producer with over a decade of export experience, these barns combine precision, sustainability, and reliability—built for real-world ranching.
Pre-Construction Planning of Small Monoslope Cattle Barn
Smart pre-construction planning ensures that your small monoslope cattle barn is efficient, cost-effective, and durable. Careful site selection, permitting, and budgeting are key to avoiding costly mistakes later.

Best Site Orientation for a Small Monoslope Cattle Barn
A well-positioned monoslope barn maximizes drainage, airflow, and sunlight, keeping cattle comfortable year-round.
- Align Roof Slope with Natural Drainage: Match a 2–5% site grade with the barn’s 6:12 roof pitch to direct runoff away from feed alleys and resting areas.
- Optimize Wind and Sun Exposure: In cold regions, face the lower wall southward for passive solar gain; in hot climates, orient northward to reduce direct sunlight.
- Plan for Effective Drainage: Monoslope roofs shed 30–40% more water than gable roofs — ensure grading prevents erosion near entrances and high-traffic zones.
Navigating Permits for a Small Monoslope Cattle Barn
Understanding permit requirements early can save time and ensure compliance.
- Roof Load & Snow Standards: Obtain engineering approval for truss loads (typically 25–40 PSF).
- Leverage EQIP Funding: A well-designed roof slope may qualify for EQIP runoff funding—up to 75% coverage.
- Check Height Restrictions: Confirm local limits on high back walls (12–16 ft) to ensure sufficient ventilation space.
By planning ahead, you’ll streamline approvals, improve efficiency, and build a more durable barn that supports both your herd and your budget.
Budget Breakdown
Understanding cost factors upfront prevents surprise overruns. Below are estimated costs by build type.
| Build Type | Estimated Cost (Per Sq Ft) | Includes |
| Steel Kit (DIY) | $25–$35 | Kit, delivery, fasteners |
| Full Turnkey Build | $40–$60 | Permits, labor, foundation, utilities |
| Steel Kit + Hired Labor | $35–$45 | Kit, delivery, fasteners, contractor labor |
| Post-Frame (Wood) DIY | $20–$30 | Lumber, hardware, delivery |
| Post-Frame (Wood) Turnkey | $35–$50 | Materials, labor, permits, foundation |
| Concrete Block Barn | $50–$80 | Concrete blocks, labor, foundation, finishing |
A DIY steel kit saves labor costs but requires construction know-how, while hired labor ensures speed but adds expense. Post-frame barns may seem cheaper initially, but higher maintenance offsets savings over time.
Typical Factory Kit Pricing by Size
| Size | Cattle Capacity | Factory Kit Price (Est.) |
| 5×10 m | 10 head | $8,000–$12,000 |
| 10×20 m | 50 head | $25,000–$35,000 |
| 20×40 m | 100 head | $50,000+ |
For operations targeting 50–100 head, a 10×20 m modular layout provides ideal airflow and feed access. Factory kits come with adjustable bays, reducing framing costs by up to 15%.Contact SteelPRO PEB to get your factory-direct quotation based on herd size and local building codes. All pricing estimates are based on prefabricated kits from SteelPRO PEB’s ISO-certified factory, ensuring consistent quality and global shipping support.
Small Monoslope Cattle Barn: Build Tips for Efficiency
Building a small monoslope cattle barn efficiently means making smart choices from the start to avoid costly fixes later. A strong foundation, precise assembly, and optimized ventilation will ensure durability, functionality, and cost-effectiveness.
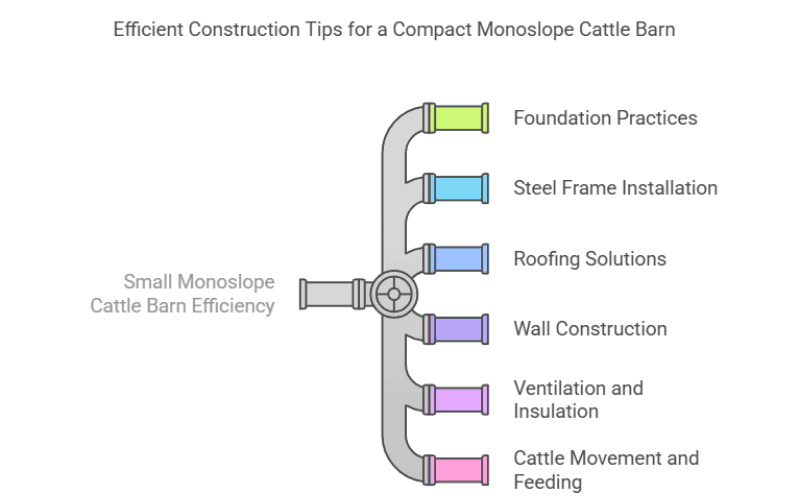
Best Foundation Practices for a Small Monoslope Cattle Barn
A well-built foundation prevents shifting, frost damage, and water pooling, all of which can compromise the structure and cattle comfort.
- Cost-Effective Frost Protection: A 6-inch crushed gravel base with geotextile fabric provides solid drainage and frost resistance for $1.50 per square foot, significantly cheaper than $8+ per square foot for concrete while maintaining stability.
- DIY Compaction Test for a Stable Base: A weak base causes uneven settling. Sprinkle water on compacted soil—if puddles form within 10 minutes, continue compacting until firm and stable.
- Reinforced Footings for Load Distribution: For barns in frost-prone areas, extend footings below the frost line (typically 36–48 inches deep) and widen them by 6–8 inches beyond the wall frame. This distributes weight evenly and minimizes frost heave risks. Use pre-mixed concrete for small-scale projects to save time and ensure consistency.
Steel Frame Alignment & Assembly Sequence
Prefab steel-frame barns are designed for efficient construction, but precision remains critical for long-term stability. Follow these streamlined steps to ensure accuracy and speed during your factory assembly process:
- Pre-labeled Bolt-Together Kits for Faster Assembly:
All major frame components arrive pre-cut, pre-drilled, and labeled (e.g., “Truss A → Slot B”). This reduces measurement errors and cuts on-site build time significantly. - Truss and Column Alignment:
Use a laser level or string line to align trusses and columns before tightening. Even small misalignments can create stress over time. - Temporary Bracing and Load Balance:
Secure temporary braces across trusses to prevent shifting until all connections are locked. Always tighten bolts in a center-out pattern for balanced load distribution. - Final Verticality Check:
Verify all columns are plumb within 1/8 inch per 10 ft of height. Adjust anchor bolts if necessary to maintain uniform alignment.
Factory-built bolt-together kits from SteelPRO PEB reduce installation time by up to 40% compared to traditional on-site framing, ensuring higher precision and lower labor costs. Each prefabricated component is CNC-cut and ISO-certified, guaranteeing consistency and long-term structural reliability.
Roofing Solutions for Monoslope Efficiency
Your roof does triple duty: shedding water, regulating heat, and optimizing airflow. Choose durable roofing materials to enhance efficiency and minimize maintenance costs in a prefabricated steel barn setup.
| Roof Type | Lifespan | Snow Load | Cattle Comfort |
| Corrugated Steel | 40 yrs | 35 PSF | Reflects summer heat (↓6°F) |
| Standing Seam | 50 yrs | 50 PSF | Quiet during rain (reduces stress) |
| Polycarbonate | 25 yrs | 20 PSF | Provides natural light, reduces energy cost |
When installed with precision fasteners and factory coatings, steel roofing extends life expectancy by decades — another cost-saving build advantage of prefabricated barns.
Wall Construction Strategies
Walls balance ventilation, durability, and behavioral needs. Let’s break it down:
High Wall vs. Low Wall Priorities
| Wall Section | Key Features | Cattle Impact |
| High Wall (12-16′) | – Install adjustable vents top 6″ <br> – Use light-colored steel | Releases summer heat plume |
| Low Wall (8-10′) | – 18″ kickboards <br> – 6″ gap boards | Blocks drafts at cow level |
Material Cost-Benefit
Textured steel panels last longer but require washing. Rough-sawn lumber needs annual sealing but reduces noise stress. Hybrid approach: steel lower 4′ + wood upper sections.
Ventilation and Insulation Strategies for Monoslope Cattle Barns
A well-ventilated barn prevents heat stress, reduces moisture buildup, and improves air quality.
- Ridge Vents and Sidewall Openings for Airflow: Maximize natural ventilation by incorporating ridge vents and adjustable sidewall openings, keeping the barn cooler in summer and drier in winter.
- Reflective Insulation for Temperature Control: In extreme climates, double-layer reflective insulation under the roof panels stabilizes temperatures without high costs.
- Extended Overhangs for Barn Protection: A minimum 3-ft overhang shields barn siding from rain splash and reduces mud buildup near feed areas.
Cattle Movement and Feeding Efficiency in Small Monoslope Barns
A functional barn layout improves feeding efficiency and cattle movement, minimizing labor while keeping animals stress-free.
- Swing Gates for Easy Cattle Handling: Strategically placed swing gates at pen entrances and exits simplify movement, reducing stress and injury risks.
- Open-Side Feed Bunks for Efficient Feeding: Position feed bunks along the open side for tractor or skid steer access, cutting down on manual labor.
- Mud Prevention Solutions for High-Traffic Areas: Install concrete aprons or geotextile fabric with crushed stone near feeding zones to keep cattle out of standing mud, reducing hoof health issues.
By prioritizing a solid foundation, precise assembly, proper ventilation, and an efficient barn layout, your small monoslope cattle barn will be more durable, easier to maintain, and provide a healthier environment for your herd.
Combining factory-precision steel fabrication with on-site efficiency, builders can cut total installation time by nearly half while improving durability.
Prefabricated steel barns from SteelPRO PEB simplify logistics, reduce waste, and deliver predictable results — key advantages for any cost-efficient construction project.
Why Steel Monoslope Barns Outperform Traditional Builds
Choosing the right material for your cattle barn isn’t just about what it’s made of—it’s about how it performs during construction and over decades of operation. Steel monoslope barns not only offer better durability but also superior build efficiency, installation precision, and long-term cost performance compared with traditional wood or concrete barns.
Faster, More Accurate Construction
Prefabricated steel barns from SteelPRO PEB are engineered for rapid factory assembly. Each beam, column, and truss is CNC-cut and pre-drilled in an ISO-certified production facility, ensuring millimeter-level accuracy on-site. This factory-controlled process eliminates many of the inconsistencies of field fabrication, cutting overall construction time by up to 40% compared with traditional framing.
Because every part is labeled and ready to bolt together, builders can start erecting the structure immediately after the foundation cures—no on-site welding, no rework, and minimal weather delays.
Consistent Quality and Reduced Maintenance
Traditional wooden barns often warp, rot, or require repainting within 10–15 years.
By contrast, steel structures maintain their integrity for decades.
SteelPRO PEB’s barns use hot-dip galvanized or PVDF-coated steel, providing corrosion and UV protection that minimizes repainting and repair costs.
- High Tolerance Precision: Components fit seamlessly, reducing stress points and improving structural life.
- Low Upkeep: Annual maintenance costs are typically 60% lower than wood-frame equivalents.
- Weather Resistance: Wind-rated up to 110 mph and snow loads up to 50 PSF, ideal for extreme climates.
Long-Term Reliability and Warranty Assurance
Every barn built by SteelPRO PEB includes a 50-year structural warranty and a 25-year coating warranty, ensuring peace of mind for decades of farm operations. This guarantee reflects not only the strength of factory-built systems but also the company’s confidence in its precision fabrication and global quality standards.
When combined with the inherent recyclability of steel (over 80% recoverable at end of life), a steel monoslope barn becomes a financially and environmentally smart investment—one that’s built to last for generations.
While traditional barns rely heavily on on-site labor and variable material quality, factory-built steel monoslope barns deliver consistent results, faster construction, and long-term performance stability. By choosing a prefabricated steel solution from SteelPRO PEB, you’re not only investing in a structure—you’re ensuring your herd’s comfort and your farm’s profitability for decades to come.
Build a Stronger Monoslope Cattle Barn with a Trusted Manufacturer
Building a reliable cattle barn isn’t just about structure—it’s about choosing the right partner who understands what ranchers need: faster builds, healthier herds, and predictable long-term performance.
With factory-built steel solutions, you eliminate on-site uncertainty. Every prefabricated steel small monoslope cattle barn is precision-manufactured at SteelPRO PEB’s ISO-certified facility, ensuring airtight joints, better airflow, and less maintenance for decades.
Our barns arrive ready to assemble, reducing project time by up to 40% and saving thousands in labor. Whether you’re expanding a small operation or managing a 100-head herd, you get structural consistency, EQIP-compliant design, and warranty-backed confidence.
Next Step: If you’re planning your next barn, start with design.
Explore How to Design a Monoslope Cattle Barn for roof pitch, layout, and ventilation strategies, then contact our engineers for a factory-direct quotation tailored to your site.
Build once, build right — with SteelPRO PEB’s certified prefabricated barns built for real-world ranching.