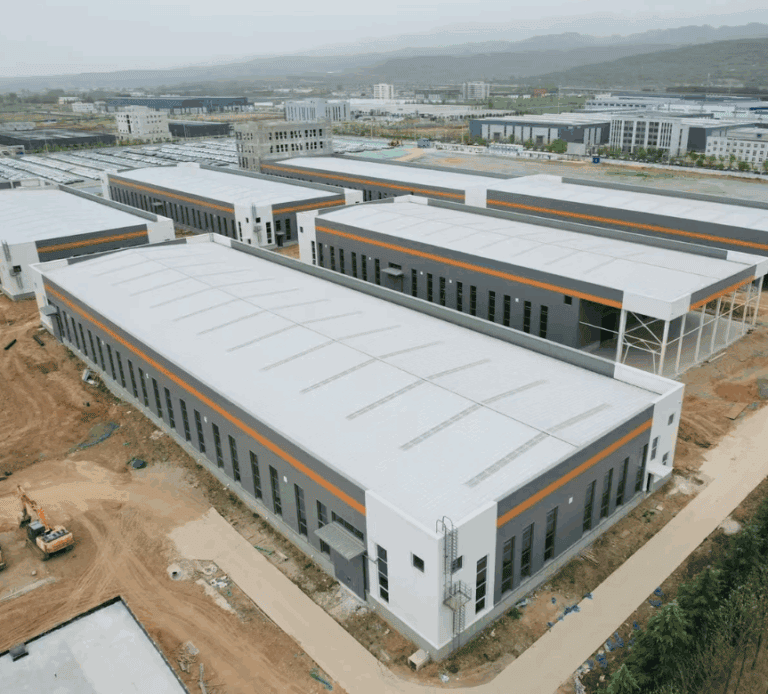
Whether it is used for agriculture, storage, garages, or as a commercial space, a pole barn can provide a stable and flexible solution.However, many individuals may find themselves puzzled regarding the construction of a fully operational pole barn.
This article offers a comprehensive guide to assist you in understanding the process of constructing a high-quality pole barn from the ground up. We will go through every step from site selection, design to construction, especially the advantages of steel pole barns. With this guide, you will have the necessary knowledge to easily start your own project.
What is a Pole Barn?
A pole barn refers to a type of structure that utilizes vertical posts, typically made of wood or steel, to support horizontal beams and a roof. Its simple design and stable structure make it a great option for large storage spaces or simple construction. The basic components of a pole barn include the following key elements:
Vertical posts: These posts are the core load-bearing part of a pole barn and are usually made of wood or steel. Wood posts are usually pressure-treated wood, while steel posts are used to increase the durability and corrosion resistance of the structure. The posts are generally anchored in the ground or set in a concrete foundation to guarantee stability and robustness.
Horizontal beams: These beams connect the posts together and support the roof frame. Based on the design, the horizontal beams can be constructed from wood, steel, or a blend of materials.
Roof structure: The roof of a pole barn is usually a pitched roof or a flat roof, depending on the functional requirements of the barn. The roof frame consists of roof beams and purlins that support the metal or wood roofing material.
Common Design Types of pole barn
The design of pole barns is quite flexible and can be customized according to specific needs. Here are two common design types:
Flat roof design: Flat roof barns have a simple roof design and are usually used for small or low structures to maximize the use of building space. In some areas where snow is not easy to accumulate, the flat roof design not only reduces material costs, but also makes the interior of the space more flexible and easy to modify.
Sloped roof design: Sloped roof is the most common design of pole barns, especially suitable for areas that need fast drainage and snow sliding off. The advantage of the sloping roof design is that it can provide better drainage function and reduce roof pressure, while also providing more space, such as a top attic or a higher interior space, which is suitable for uses that require larger storage space.
Next, we’ll take a deep dive into how to build a pole barn from scratch. Whether it’s for agricultural storage, garage construction, or commercial use, the following steps will help you easily master the key aspects of the construction process.

Design and Planning: Pole Barn size
Before starting the construction of a pole barn, proper design and planning are crucial. These steps ensure the project runs smoothly and help avoid potential issues in the future, both legally and functionally.
1. Define Your Purpose
Before you start any construction, it’s important to first understand why you’re building a pole barn. Imagine how you’ll use the pole barn in the future and sketch out a basic layout to help determine the best size and design.
Key factors that influence pole barn design
- Size: How much space do you need? Do you need the possibility of future expansion?
- Height: If you want to store tall equipment (such as RVs), the roof height must be sufficient.
- Type and number of doors: sliding doors, rolling doors, double doors, or large custom garage doors?
- Ventilation and lighting: Do you need windows? Is natural ventilation sufficient? Do you need to install additional electrical systems?
- Floor material: Do you need a simple gravel floor, or is concrete a better choice?
Common Uses and Recommended Sizes
| Purpose | Recommended Size | Key Considerations |
| Agricultural Storage | 30’ x 40’ or larger | Needs ample space for tractors, hay, and equipment. Ventilation is crucial. |
| Garage or Carport | 24’ x 30’ (2 cars), 30’ x 40’ (RV or multiple vehicles) | Door height should accommodate vehicles. Consider insulation. |
| Horse Barn or Livestock Shelter | 36’ x 48’ (for 4-6 horses) | Stalls, feeding space, and good ventilation are essential. |
| Workshop or Hobby Space | 20’ x 30’ or 30’ x 40’ | Needs power outlets, lighting, and possible climate control. |
| General Storage Shed | 20’ x 20’ or larger | Open-sided or enclosed, depending on stored items. |
| Multi-Purpose Barn | 40’ x 60’ or larger | Combines storage, workspace, and vehicle shelter. |
💡 Pro Tip:
- Future Expansion: If you anticipate needing more space, choose a design that allows for easy additions.
- Ceiling Height Matters: Standard pole barns have 10’–12’ ceilings, but if storing an RV, tractor, or horse trailer, consider 14’–16’ height.
- Door Width & Height: If accommodating vehicles, garage doors should be at least 10’ wide and 12’ high.
2. Choose the Right Location
Finding an ideal location is essential for the stability, durability, and usability of your pole barn. Consider the following factors:
Drainage & Ground Conditions
- Avoid building in low-lying areas where water may accumulate, which can weaken the structure.
- If the site has poor drainage, consider digging trenches or laying gravel to improve water runoff.
Orientation & Sunlight Exposure
- Wind Direction: Position openings (doors and windows) on the leeward side to reduce wind exposure.
- Sunlight: If you want to keep the interior warm, orient the windows and doors toward the south (in the Northern Hemisphere). If heat is a concern, consider extended eaves or shading solutions.
- Accessibility: Ensure there is a clear and easy route for vehicles and equipment to enter and exit the barn.
Distance from Other Structures
- Keep the pole barn away from underground utilities, septic tanks, or wells to prevent maintenance issues.
- If the site is small, measure the space between the barn and other structures like houses, fences, or trees to ensure enough working room.
- Check Local Regulations: Some regions have minimum setback requirements, such as keeping the barn at least 10-20 feet from neighboring properties.
💡 Pro Tip: Before starting construction, mark the pole barn’s outline on the ground using wooden stakes or spray paint. Observe how the area handles sunlight and drainage throughout the day.
3. Check Local Permits & Regulations
Before building your pole barn, it’s crucial to understand local government regulations and permit requirements to avoid fines or forced removal.
Obtain a Building Permit
- Contact your local government office (city hall or planning department) to find out whether a building permit is required.
- Submit construction plans, including dimensions, intended use, materials, and drainage solutions.
- You may need to provide blueprints or a site plan.
Determine If Foundation Approval Is Needed
- Some areas require pole barns to have concrete foundations or footings, while others allow directly buried wooden posts.
- In colder climates, posts may need to be buried below the frost line to prevent shifting due to ground freezing.
Understand Additional Building Codes
- Electrical Wiring: If you plan to install power outlets or lighting, electrical work may need to comply with local codes.
- Plumbing & Drainage: If you need water supply (for livestock, washing vehicles, etc.), make sure it meets municipal water regulations.
- Fire Safety Regulations: If storing flammable materials, you may be required to use fire-resistant materials or maintain a minimum safety distance from other structures.
💡 Pro Tip: Even if your pole barn is a simple open shelter, some regions still require permits, so always check with your local authorities in advance.
Gather building materials needed for the pole barn
To guarantee a smooth construction process, ensure you have all the essential tools and materials readily available. Here’s a list of commonly required tools and materials:
- Tools List:
- Level: To check that posts and beams are vertical and the foundation is level.
- Electric Drill: For drilling holes, screwing in bolts, and fastening materials.
- Concrete Mixer: If using concrete for the post bases, a concrete mixer will make the job faster and more efficient.
- Saw: For cutting wood or metal materials.
- Shovel: To dig holes or prepare the ground.
- Nail Gun or Hammer: For driving nails or securing materials.
- Materials List:
- Steel or Wooden Posts: These will support the frame of the barn. Choose the suitable material and size according to your design specifications.
- Roofing/Wall Panels: Metal or wooden panels, depending on your needs.
- Bolts and Screws: For securing posts, beams, and roofing materials.
- Concrete: To install the posts in the ground and guarantee they are securely fastened.
- Lumber or Steel: For the frame and structural components of the barn.
By clearing the site, marking the layout, and gathering all the necessary tools and materials, you’ll pave the way for a smoother and more efficient construction process. Proper preparation helps save time and reduces the likelihood of mistakes or rework later on.
Pole Barn Construction Process
Building a pole barn requires careful execution at each step to ensure durability and functionality. Below is a step-by-step guide to help you complete the construction successfully.
1. Site Preparation
Before any construction begins, proper site preparation is essential to ensure a stable foundation and a well-aligned structure.
Clear the Land
- Remove rocks, tree roots, and other debris that might interfere with construction.
- If the ground is uneven, level the site using a skid-steer, tractor, or grading equipment.
Mark the Building Area
- Use stakes and string lines to outline the exact perimeter of the pole barn.
- Double-check dimensions using a measuring tape and level to ensure accuracy.
- Mark locations for each pole placement, as they will serve as the main structural support.
💡 Pro Tip: Use spray paint or chalk to mark key areas, including entry points and corner posts.
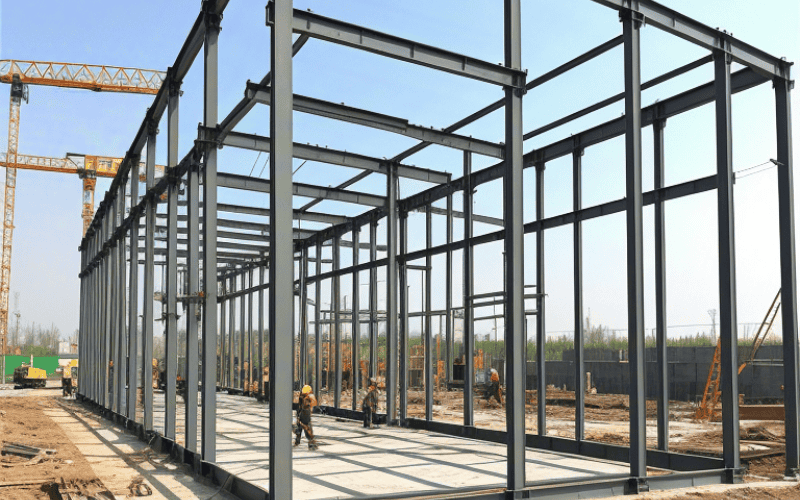
2. Setting the Poles
The poles act as the backbone of your structure, so it’s crucial to install them correctly.
Digging Post Holes
- Depth: Typically, holes should be 3-5 feet deep, depending on soil type and local frost line requirements.
- Spacing: Poles are usually placed 8-12 feet apart, ensuring enough support for the roof.
- Use an auger, post-hole digger, or backhoe to make digging easier.
Installing the Poles
- Place each post into its respective hole and ensure it is completely vertical using a level.
- Secure poles temporarily with braces before adding concrete.
Securing the Poles
- Pour concrete into each hole and let it set for at least 24-48 hours before continuing with construction.
- Alternatively, for more drainage-friendly installations, you can use compacted gravel instead of concrete.
💡 Pro Tip: Consider using pressure-treated wood poles to prevent rot and extend the lifespan of your barn.
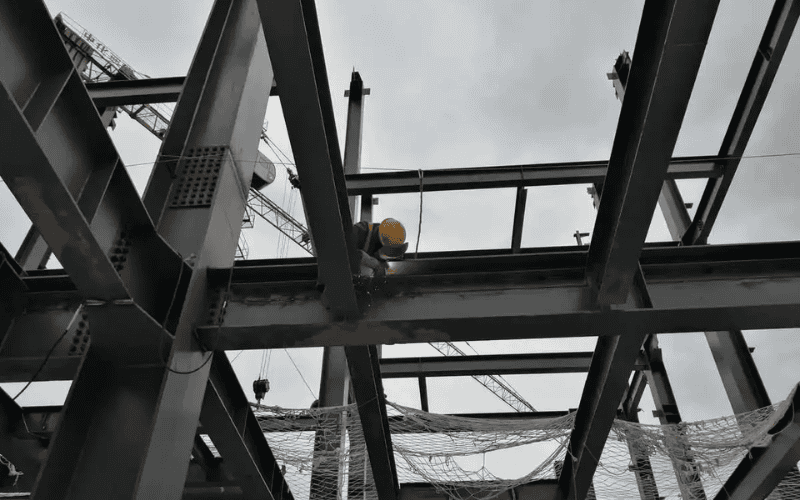
3. Installing the Support Beams
Once the poles are securely in place, the next step is to install support beams to connect them and provide stability.
Attach Horizontal Beams
- Secure horizontal support beams between the poles using lag bolts, carriage bolts, or brackets.
- Position the beams at the top of the poles to form the base for the roof structure.
Ensure Stability
- Check that all beams are level before tightening bolts.
- For larger pole barns, consider adding cross-bracing to prevent lateral movement.
💡 Pro Tip: Using a laser level can ensure beams are aligned perfectly, reducing structural issues later on.
4. Attaching the Roof
The roof provides protection from the elements, so selecting the right materials and ensuring proper installation is crucial.
Choosing Roofing Materials
- Metal roofing: Durable, low maintenance, and excellent for barns.
- Wood shingles or asphalt shingles: More traditional look but require more upkeep.
Installing Roof Trusses
- Attach roof trusses to the support beams, spacing them according to manufacturer recommendations (usually 4-8 feet apart).
- Secure trusses using metal brackets or wooden purlins.
Adding Roof Panels
- Install roofing panels starting from one end and overlapping to prevent leaks.
- Use screws or roofing nails to secure panels tightly.
- Install a ridge cap along the top to provide additional weather protection.
💡 Pro Tip: Consider adding gutters and downspouts to direct rainwater away from the barn and prevent foundation damage.
5. Adding Walls (Optional)
Not all pole barns require walls, but if you want added protection, insulation, or security, here are your options.
Open vs. Enclosed Design
- Open-sided barns are great for livestock shelters or equipment storage.
- Fully enclosed barns provide better protection against weather and theft.
Choosing Wall Materials
- Steel panels: Durable, weather-resistant, and easy to install.
- Wood siding: Provides a rustic look but may require maintenance.
- Combination materials: Mix steel, wood, or even polycarbonate panels for a custom look.
Planning for Doors & Windows
- Install large sliding or roll-up doors for easy equipment access.
- Add windows for natural light and ventilation, especially if using the barn as a workshop.
💡 Pro Tip: If installing walls, consider adding insulation if you plan to use the barn year-round.
6. Flooring Options
The type of flooring depends on how you plan to use the barn. Here are the best options:
Gravel Floor (Economical Choice)
- Pros: Low cost, excellent drainage, and easy to install.
- Cons: Can be dusty, may shift over time, and isn’t ideal for heavy equipment storage.
Concrete Floor (Best for Durability)
- Pros: Strong, stable, easy to clean, and supports heavy loads.
- Cons: Higher upfront cost, may require drainage channels.
Wooden Floor (Best for Workshops/Living Spaces)
- Pros: Warmer underfoot, good for workshops, and aesthetically pleasing.
- Cons: Can rot over time if not treated, not ideal for heavy equipment.
💡 Pro Tip: If using gravel flooring, consider adding a geo-textile fabric layer underneath to reduce weed growth and prevent shifting.
Finishing Touches of Building Pole Barn
Once the main structure of your pole barn is complete, the finishing touches will enhance its functionality, comfort, and durability. These final steps help ensure your barn remains practical and efficient for years to come.
1. Insulation & Ventilation
Depending on how you intend to use your pole barn, insulation and ventilation may be necessary to maintain comfort and prevent moisture buildup.
✅ Do You Need Insulation?
- If your barn will be used as a livestock shelter, workshop, or storage for temperature-sensitive equipment, insulation helps maintain a stable climate.
- In cold climates, insulation prevents heat loss, reducing heating costs.
- In hot climates, insulation helps keep the interior cooler.
Common Insulation Options:
- Spray Foam Insulation – Best for sealing gaps and providing high R-value.
- Fiberglass Batts – Cost-effective and good for walls/ceilings but requires vapor barriers.
- Rigid Foam Board – Ideal for moisture resistance and easy installation.
✅ Natural vs. Mechanical Ventilation
Proper airflow prevents condensation, mold growth, and excessive heat buildup.
- Natural Ventilation
- Install ridge vents, soffit vents, or gable vents to allow air to circulate naturally.
- Windows and open-door designs also improve airflow.
- Best for barns with minimal insulation.
- Mechanical Ventilation
- Use exhaust fans to remove hot air and moisture.
- Install ceiling fans to improve air circulation, especially in livestock shelters or workshops.
- Best for enclosed barns where natural airflow is limited.
💡 Pro Tip: If storing vehicles or chemicals inside the barn, ensure proper ventilation to prevent harmful fume buildup.
2. Electrical & Plumbing (If Needed)
If you plan to use your pole barn for more than simple storage, adding electrical and plumbing systems can improve convenience and functionality.
✅ Installing Electrical Components
- Lighting:
- LED overhead lights for energy efficiency and bright illumination.
- Motion-sensor lights for security and convenience.
- Power Outlets:
- Install 120V outlets for general use (power tools, chargers).
- Consider 240V outlets for high-powered equipment (welders, air compressors).
- Backup Power:
- A generator hookup may be useful if your barn needs power during outages.
💡 Pro Tip: Always hire a licensed electrician to ensure safe and code-compliant installation.
✅ Plumbing Considerations
If your barn requires running water, plan for:
- Hose bibs (outdoor water spigots) for easy access.
- Livestock waterers with automatic filling systems.
- Drainage systems to prevent standing water inside the barn.
- Water heaters if you need warm water for washing vehicles or feeding animals in cold weather.
💡 Pro Tip: In cold climates, insulate pipes and install frost-free hydrants to prevent freezing.
3. Doors & Windows
The right doors and windows improve accessibility, security, and natural lighting in your pole barn.
✅ Choosing the Right Doors
- Sliding Doors – Space-saving and ideal for agricultural barns or large openings.
- Roll-Up Garage Doors – Great for workshops and vehicle storage, offering a secure and weatherproof option.
- Double-Hinged Doors – Traditional and easy to install for smaller barns.
💡 Pro Tip: If frequently moving large equipment in and out, consider wider openings (12’+ width) to accommodate vehicles and trailers.
✅ Adding Windows for Light & Ventilation
- Natural Lighting: Strategically placed windows or skylights reduce the need for artificial lighting.
- Ventilation: Operable windows (with screens) help improve airflow while keeping pests out.
- Security: Consider reinforced windows or shutters to protect against break-ins.
💡 Pro Tip: Polycarbonate or tempered glass windows are more durable and resistant to breakage than standard glass.
Maintenance and Longevity of Pole Barn
To ensure your pole barn lasts for decades, regular maintenance is essential. Here are key steps to keep it in top condition:
Check Structural Components
- Inspect wooden support posts for signs of moisture, rot, or termite damage.
- If using steel siding or roofing, check for rust or corrosion and apply protective coatings as needed.
- Tighten any loose bolts or screws that may have shifted over time.
Clean the Roof and Gutters
- Clear leaves, dirt, and debris from the roof and gutters to prevent water buildup.
- If your barn has a metal roof, check for any loose panels or screws.
- Inspect the roof after storms to ensure no damage has occurred.
Manage Drainage & Prevent Water Damage
- Ensure gutters and downspouts are directing water away from the foundation.
- If using a gravel floor, rake and level it periodically to maintain drainage.
- For barns with concrete floors, check for cracks and repair them as needed.
Pest Control & Rodent Prevention
- Seal any gaps in the walls, roof, and doors to prevent small animals from entering.
- Keep food sources (such as grain or hay) properly stored in sealed containers.
- Use rodent traps or deterrents if necessary.
💡 Pro Tip: Applying a protective sealant to wooden posts and walls every few years helps extend the lifespan of the structure.
How to Build a Pole Barn on a Budget
Constructing a pole barn within a budget is entirely feasible with thorough planning and prudent decisions. Here are some tips to assist you in building your pole barn without exceeding your financial limits:
1. Plan and Design Carefully
- Keep the design simple: The simpler the design, the lower the cost. Avoid unnecessary complexity in shape or features. A straightforward rectangular or square design is more budget-friendly.
- Right size: Materialsld as large as you need. Determine the exact space requirements for your purpose (storage, workshop, etc.), and avoid extra square footage that will increase costs.
2. Use Affordable Material
- Metal roofing: Metal roofing is durable and cost-effective in the long term. While initial costs may seem high, it requires less maintenance compared to shingles, making it a good investment.
- Gravel floors: Instead of pouring a concrete floor, consider using a gravel floor, which is much cheaper and still provides good drainage.
3. Do Some of the Work Yourself
- DIY: If you possess the necessary skills and tools, undertaking the work yourself can result in substantial cost savings. Tasks like digging post holes, setting posts, building walls, and installing roofing can all be done with a bit of hard work.
- Ask for help: Enlist friends or family who may have construction experience or who are willing to help for a low cost or in exchange for future favors.
4. Limit Expensive Features
- Minimal windows and doors: Keep the number of windows and doors to a minimum. Custom windows and large, elaborate doors can drive up costs.
- No insulation or interior finishing: While insulation and finished interiors can add comfort, they are not necessary for basic storage purposes. Consider finishing the interior later, when you have more funds available.
5. Get Creative with the Foundation
- Use concrete blocks or gravel: Instead of a full concrete foundation, consider using concrete blocks or gravel for a less expensive option. This will provide a stable base without the high costs of pouring a full concrete slab.
6. Check for Permits and Regulations
- Avoid fines: Make sure you check local zoning and building regulations to avoid fines or delays. While permits can cost money, failing to get them might result in additional fees down the line.
Choose Our Pole Barn Kits – Save Time & Effort
Building a pole barn can be complex, but our Pole Barn Kits make it fast, easy, and hassle-free. Each kit includes pre-cut, pre-measured materials and step-by-step instructions, so you can build with confidence—no extra trips to the hardware store!
✔ All-in-One Solution – Everything you need, delivered to your door.
✔ Quick & Easy Assembly – No guesswork, just follow our simple guide.
✔ Time & Cost Savings – Pre-selected, high-quality materials at great value.
✔ Customizable for Your Needs – Perfect for storage, workshops, garages, and more.
FAQs
What is the cheapest barn construction option?
The cheapest barn construction is typically a pole barn (also known as a post-frame building). Pole barns are cost-effective because they have a simple design and require fewer materials compared to traditional barns.
How deep should pole barn posts be in the ground?
For most pole barns, posts should be buried 3 to 4 feet deep in the ground. The depth can vary depending on your local climate and soil conditions. In areas with freezing temperatures, the posts may need to be buried below the frost line (typically 4 feet or more) to avoid shifting or frost heave.
Can you use 4×4 posts for a pole barn?
While it is possible to use 4×4 posts for a pole barn, they are typically not recommended for larger or heavier barns. For better stability and load-bearing capacity, 6×6 posts or larger are generally preferred. 4×4 posts are better suited for smaller, lighter structures.
What is the alternative to a pole barn?
An alternative to a pole barn is a steel-frame building. Steel-frame buildings offer durability and are often used for larger commercial structures.
Why are pole barns cheaper?
Pole barns are cheaper due to their simple design, less material usage, and faster construction. Contrary to conventional structures, pole barns do not necessitate a comprehensive foundation, and their frame can be constructed using fewer posts and materials. Additionally, pole barns are quicker to construct, which reduces labor costs. They also typically require less maintenance and are durable, offering long-term savings.
How Much Does It Cost to Build a Pole Barn?
The cost of building a pole barn depends on factors like size, materials, location, and customization. Prefabricated pole barn kits offer an affordable and time-saving option, while fully custom builds may require more planning and labor. Choosing pre-cut materials and efficient designs can help reduce costs and speed up construction.